Icicles
A Deepdive into Procedural Icicles
If you’ve ever tried to make an icicle in 3D, you might have started by just stretching out a cone, giving it some glassy material and copy/pasted some icicles here and there. You may even have used some scatter system. But when you rendered your shot or walked through your game you realized that it looks a bit off. Too clean, too symmetrical and the shader kinda looks like ice but not really. Something feels off but you cant put your finger on it…
We can (and should for optimization reasons) take that kind of shortcut if it’s just some background detail, but as soon as that icicle gets a close-up, it starts to break the immersion. Now we have to think about how an actual icicle looks like, and how we can recreate that in our 3D software.
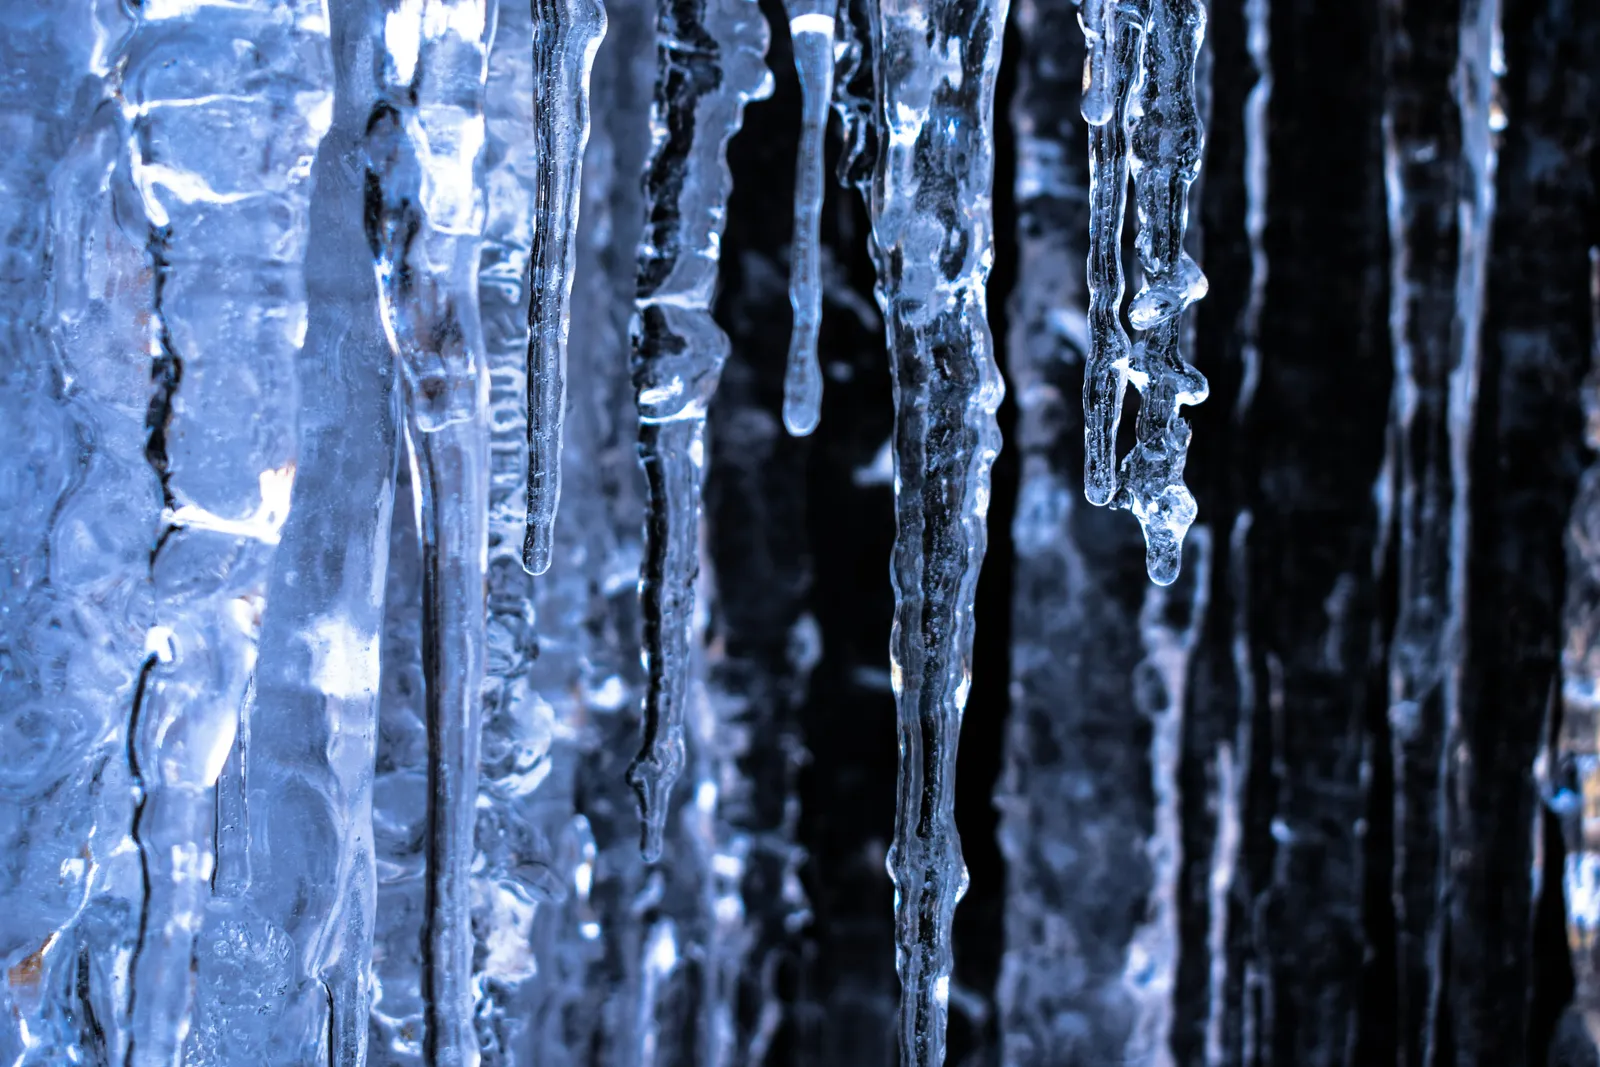
The truth is, icicles are surprisingly complex and full of character. Even scientists couldnt explain them fully yet (e.g. why the ripples on icicles appear at a consistent ~1 cm spacing regardless of size). They are shaped by a mix of flowing water, freezing air, impurities and time. Understanding that process is what separates a convincing icicle from the generic cylinder with a shiny shader that we want try to avoid from now on.
A Bit of Production Experience
During my time on The Last of Us Part II, I was responsible for creating a procedural system to generate thousands of icicles to recreate the frozen environments of the show. The challenge wasn’t just a technical one, the hardest part was making them blend seamlessly with the real icicles that were already in our on-set footage.
To get that right I had to understand what I actually see in my reference images, and find out how icicles actually grow - What shapes them, what makes them uneven, why and how they form in clusters and today I want to share all my findings.
And just to be clear, this guide is about understanding the logic behind icicles so you can recreate them believably in 3D, so we arent going into equations or deep science. Once you see the patterns that shape them, you will immediately notice why so many CG versions feel off, and how getting those small details right will make a huge difference in your next scene.
If you don’t have time to read everything, no problem. Here is the TLDR
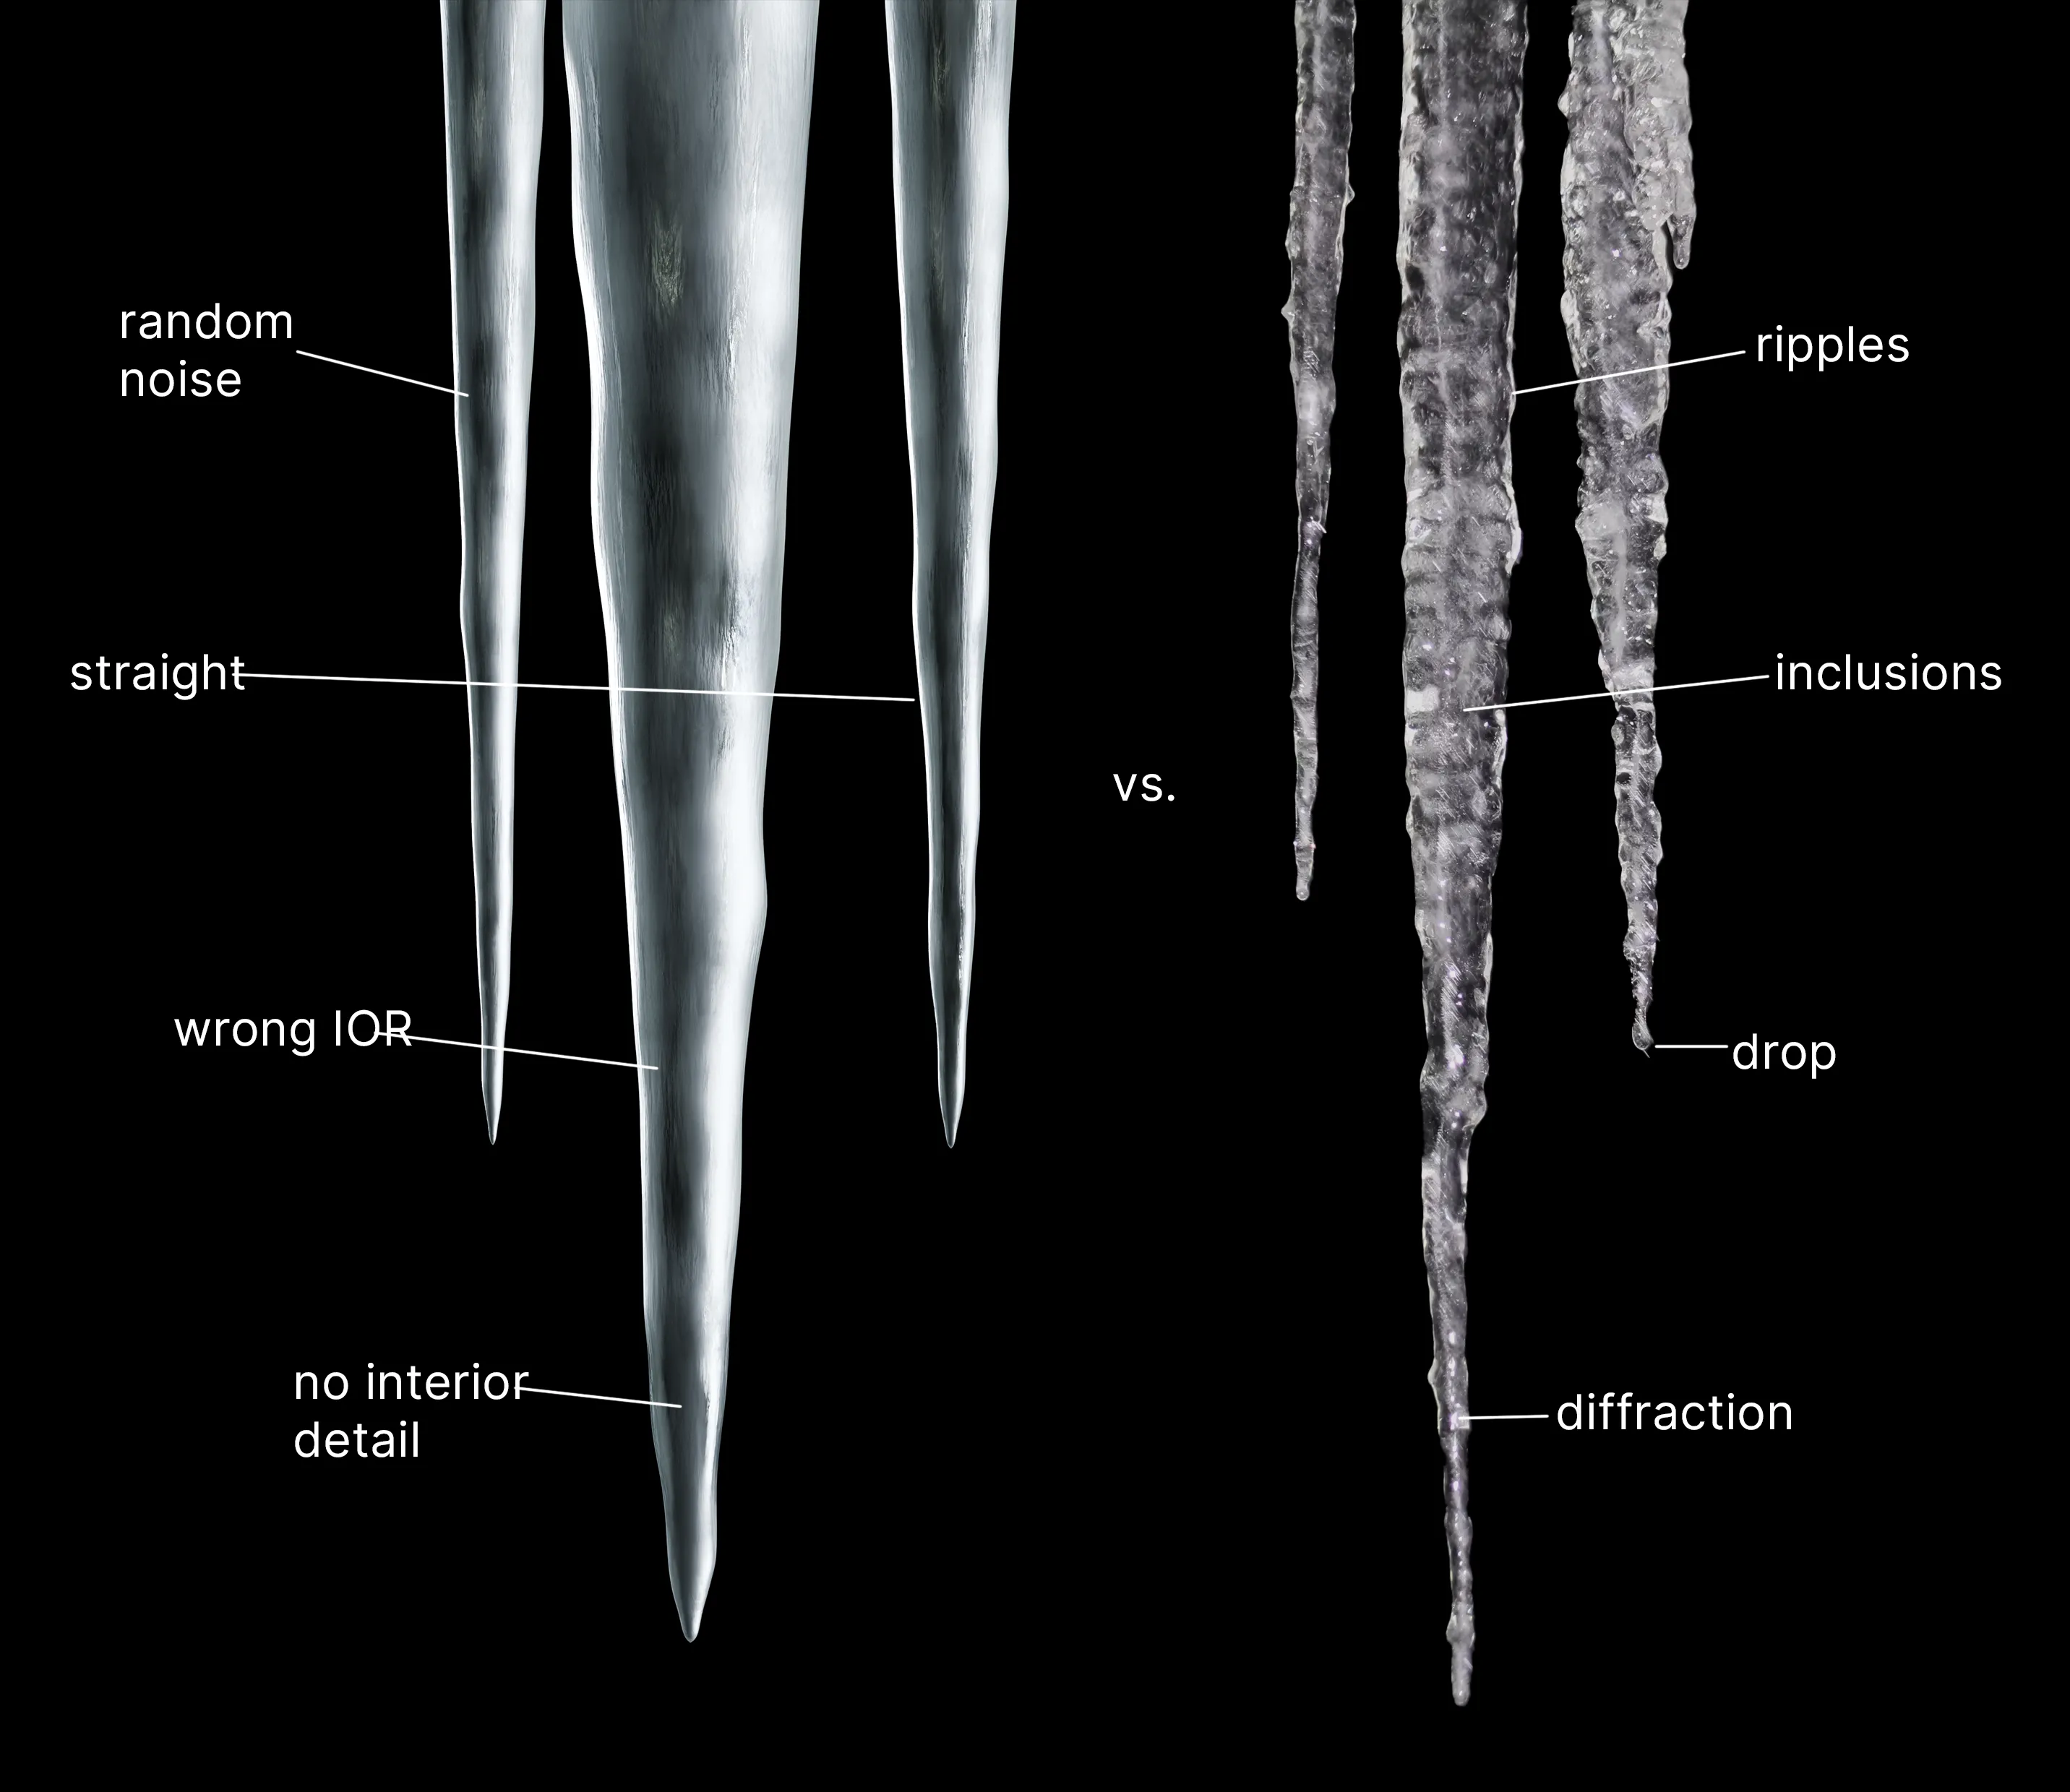
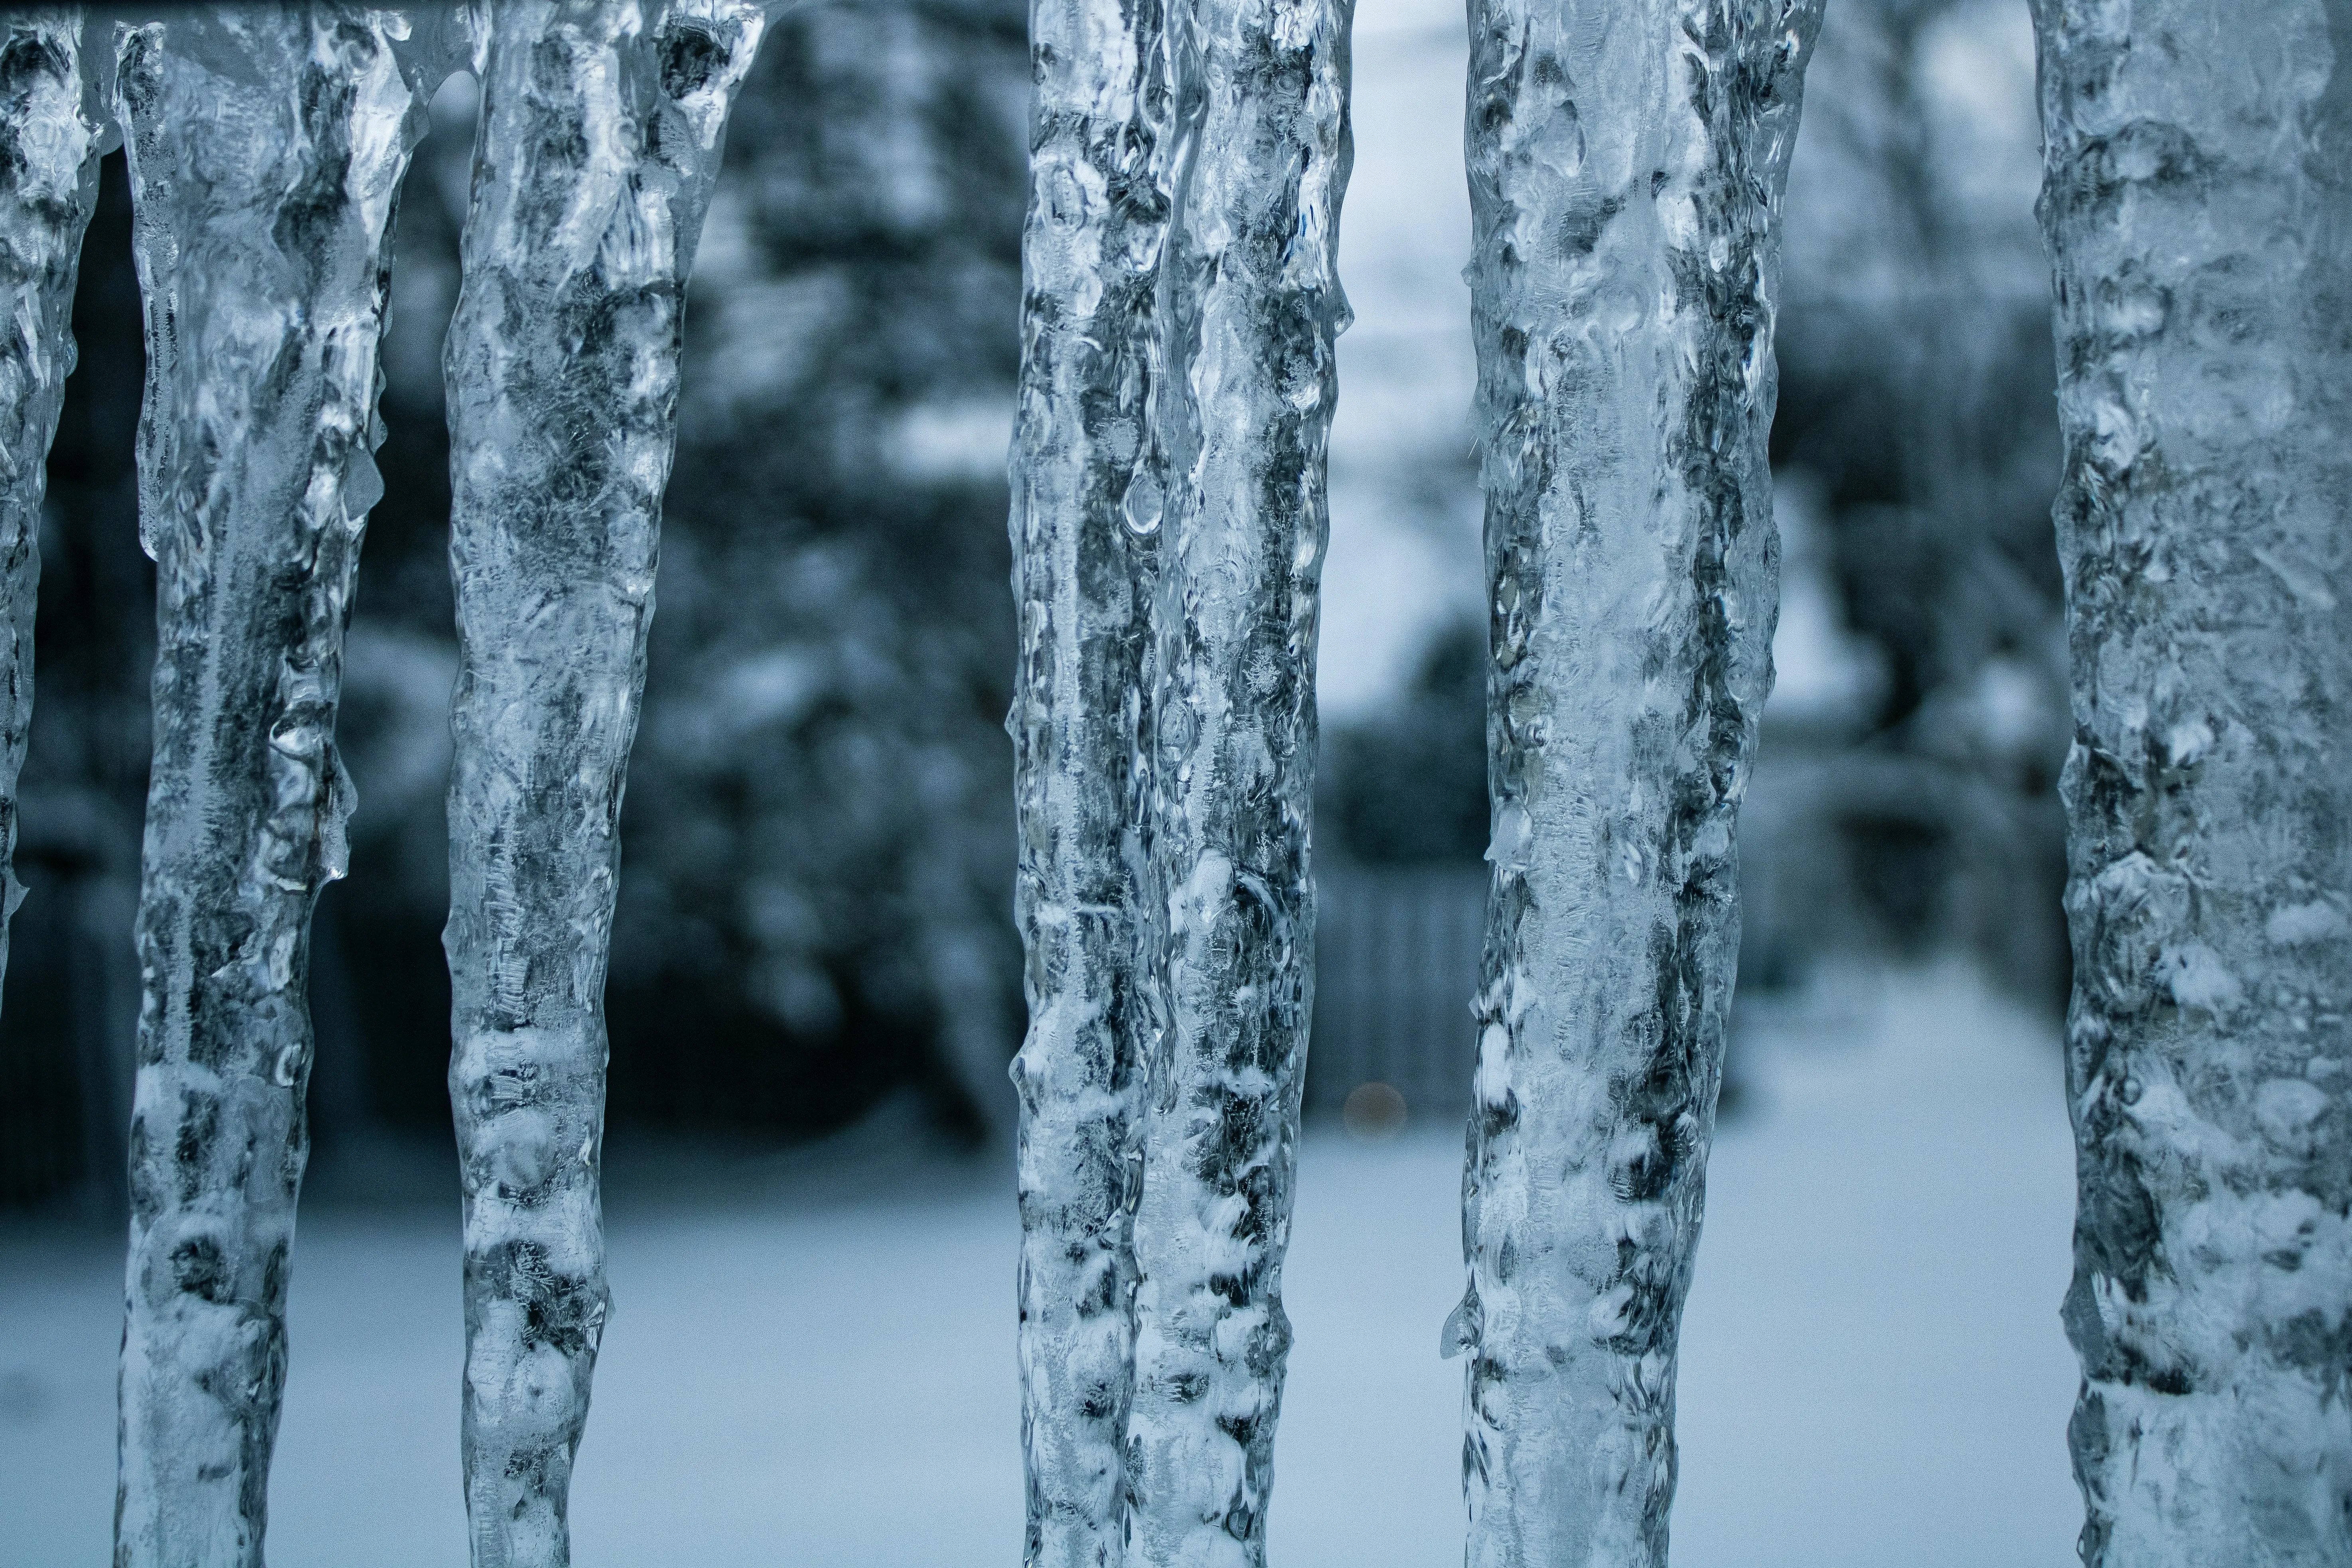
Shape & Silhouette First of all don’t just stretch a cone and call it an icicle. Real icicles have irregular silhouettes, slight bends and surface ripples (small, horizontal bumps all over the icicle). Those ripples always appear roughly 1cm apart, no matter how big or small the icicle is. Use a Worley noise scaled in y to recreate it. Pipe a high frequency tiling noise into the normal map to mimic the thin waterflow channels between the ripples. Always check which level of detail your project needs - don’t waste time creating microscopic patterns for background assets.
Material & Lighting
The most common mistake here is to use the IOR for glass (which is 1.5). The correct IOR for ice is 1.309. It doesnt sound like a lot but it completely changes how light behaves inside. Also, ice is not perfectly clear and light scatters inside it, so you want to have a milky glowy look. Use Subsurface Scattering (SSS) to recreate that effect. Make the tip of the icicle clearer and the body cloudier to mimic how impurities behave when ice freezes.
Placement & Scattering They don’t just spawn randomly and everywhere. On houses they are usually at the edge of the roof because of “ice dams” (melted water which refreezes at the colder edge). In nature they appear in clusters that have more variation in size and spacing. The best way to scatter them procedurally is to mimic a poisson disk distribution (use a Perlin noise to control density and size). That will get you a believable cluster with a few big icicles and many smaller ones. Also make sure the icicles are actually connected to whatever they stick on. The look of it will change depending on the material they grow on. Don’t just stick them to a surface.
What an Icicle Really Looks Like and how we can recreate it in 3D
How Icicles form
Before we even open our 3D software and start modeling anything, it helps to understand what we are actually trying to create. The core process is that icicles form because water is both flowing and freezing at the same time. So two things are happening at the same time:
- a) It gets thicker: A thin film of meltwater to run down the surface. As it flows, the surrounding cold air constantly removes heat from that super thin liquid water layer. Each pass adds another microscopic sheet of ice, and so the icicle slowly thickens.
- b) It gets longer: But the air isnt cold enough to freeze all the water instantly. Some water makes it to the bottom and hangs there as a droplet. Gravity now tries to pull the droplet down while the cold air tries to freeze it. Usually it freezes before it can fall off and when you repeat that process over hours or days, you get the classic icicle taper shape.
Why they grow even though the air temperature is below freezing
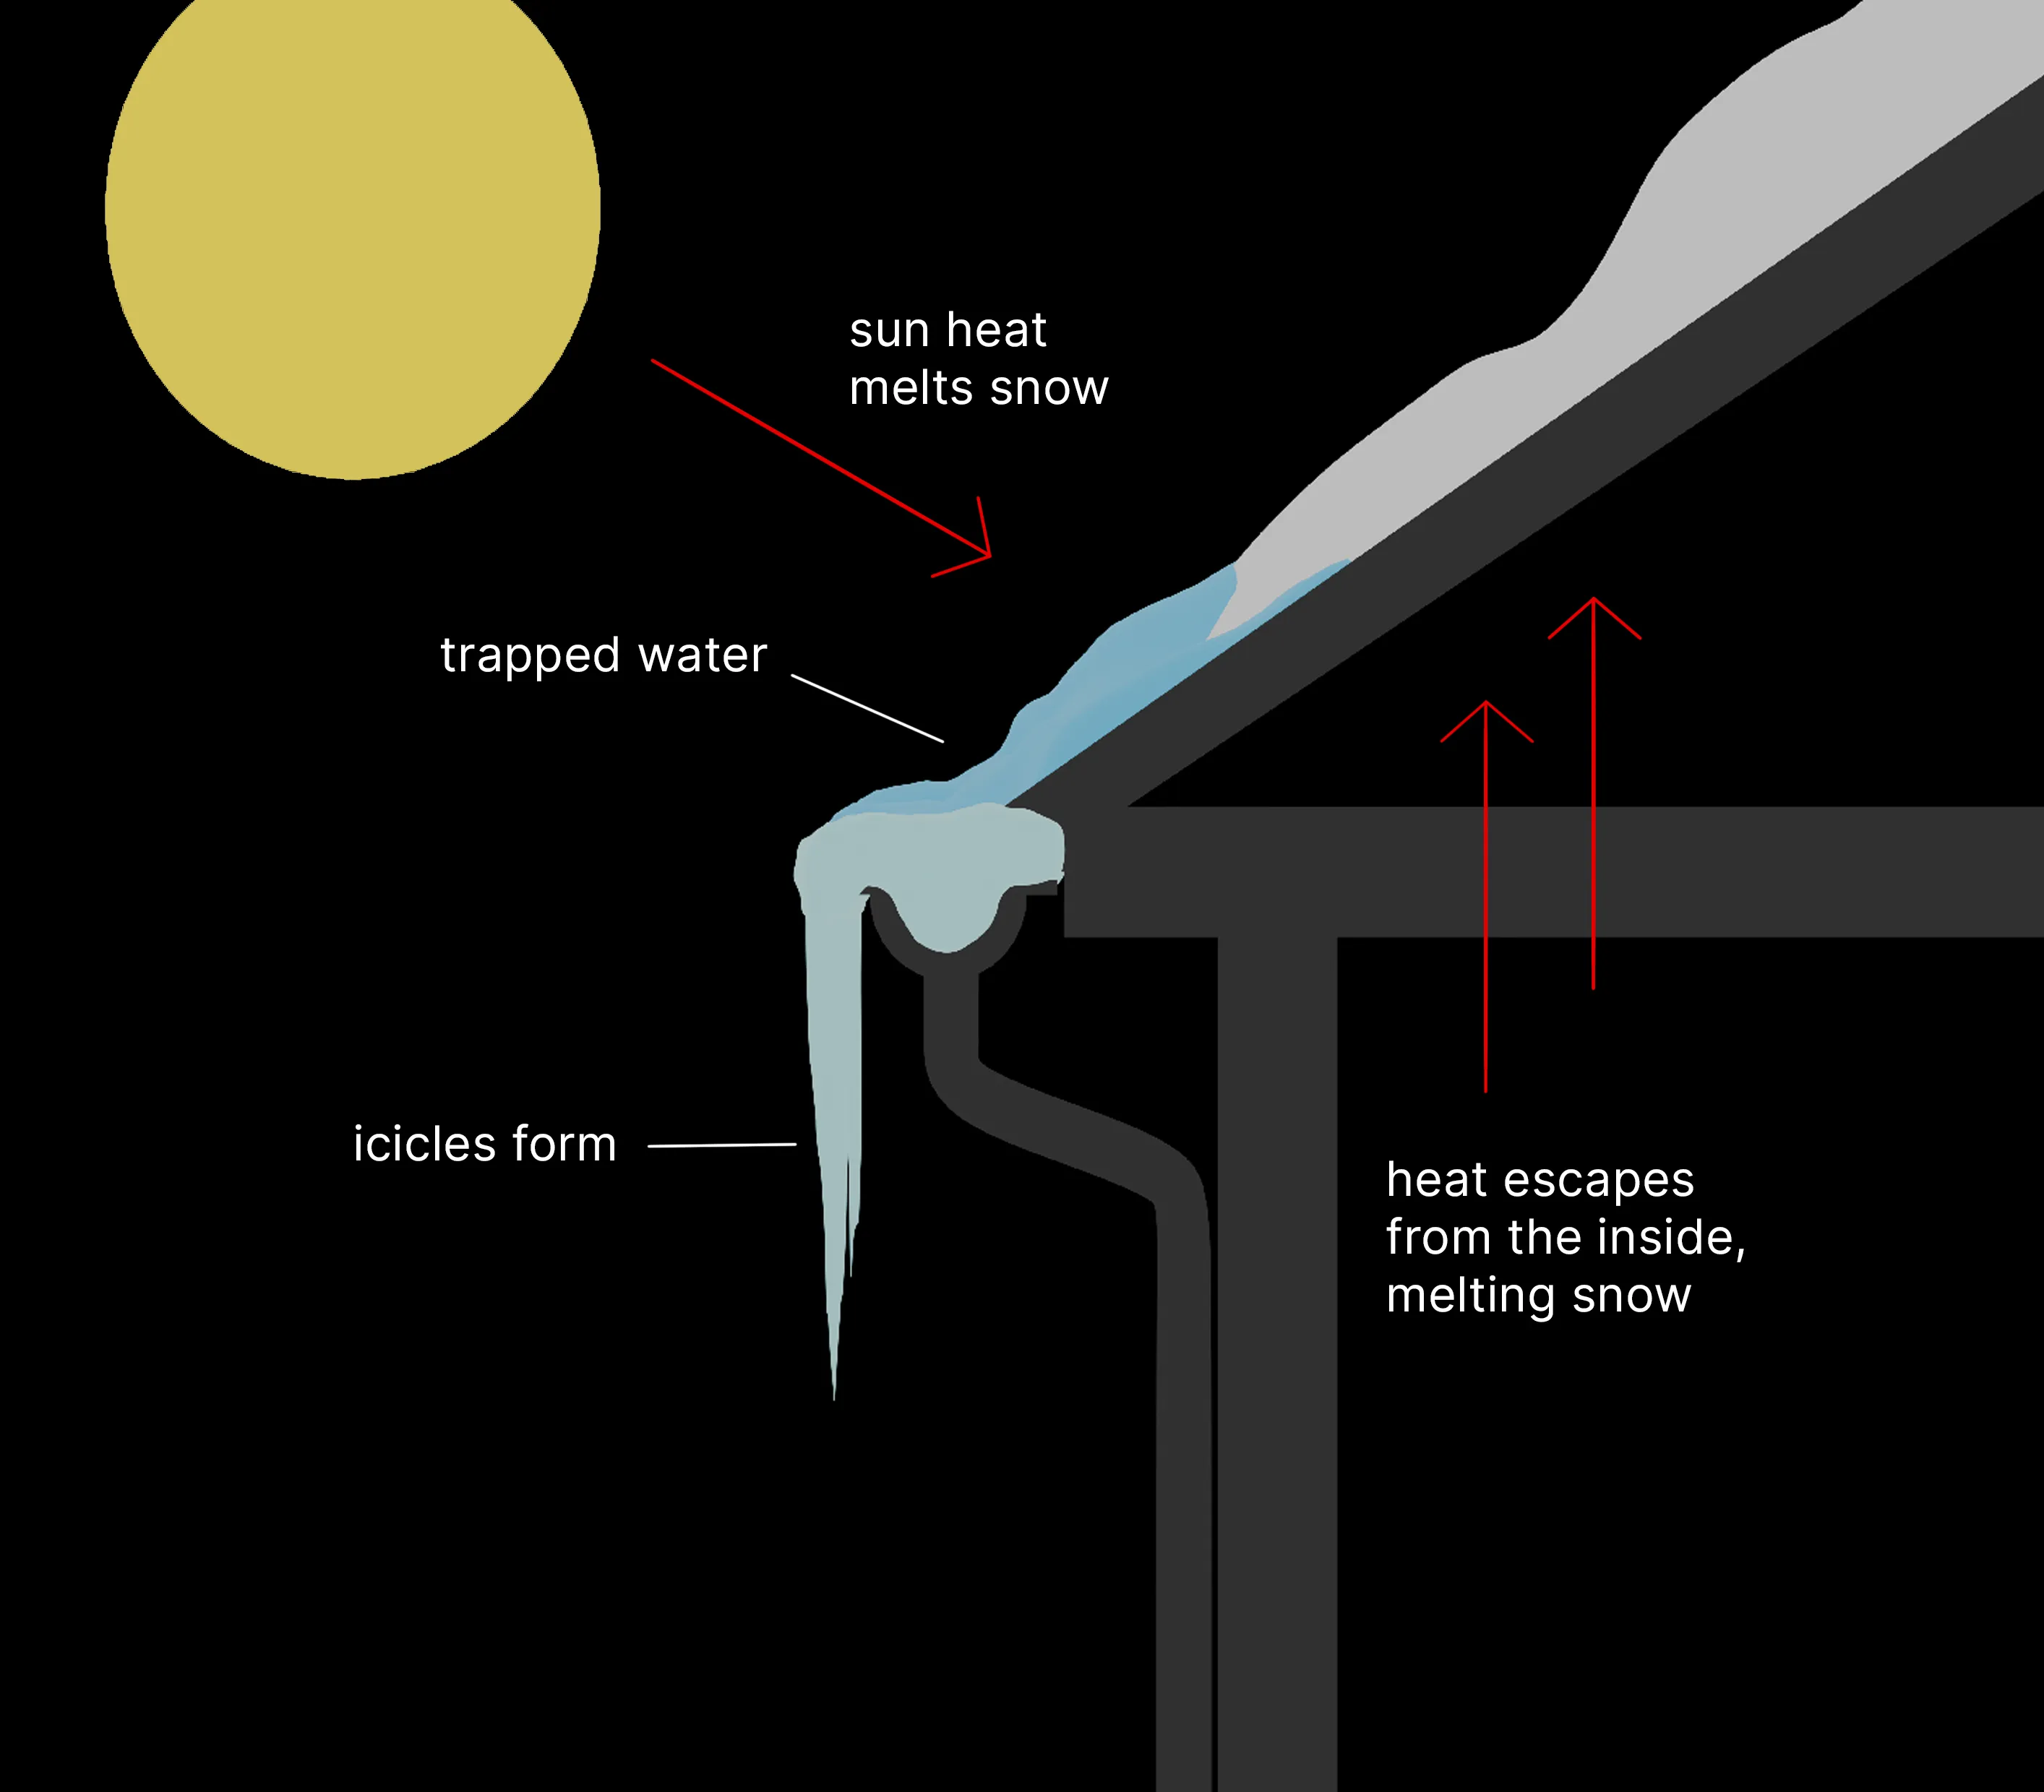
It seems counterintuitive but icicles keep growing even when the air temperature is below 0°C. That’s because the air temperature is not the only thing that matters. The icicle needs a source of meltwater, which is created by a heat source from above.
On a house, this heat leaks from the inside through the roof. In nature, it’s often direct sunlight warming a dark rock or a snowpack, which then creates enough meltwater that will freeze again further down.
This contrast between warm from above and cold air below is what it needs to grow. You wont see much active icicle growth on a cloudy or very cold day because there is no source of meltwater.
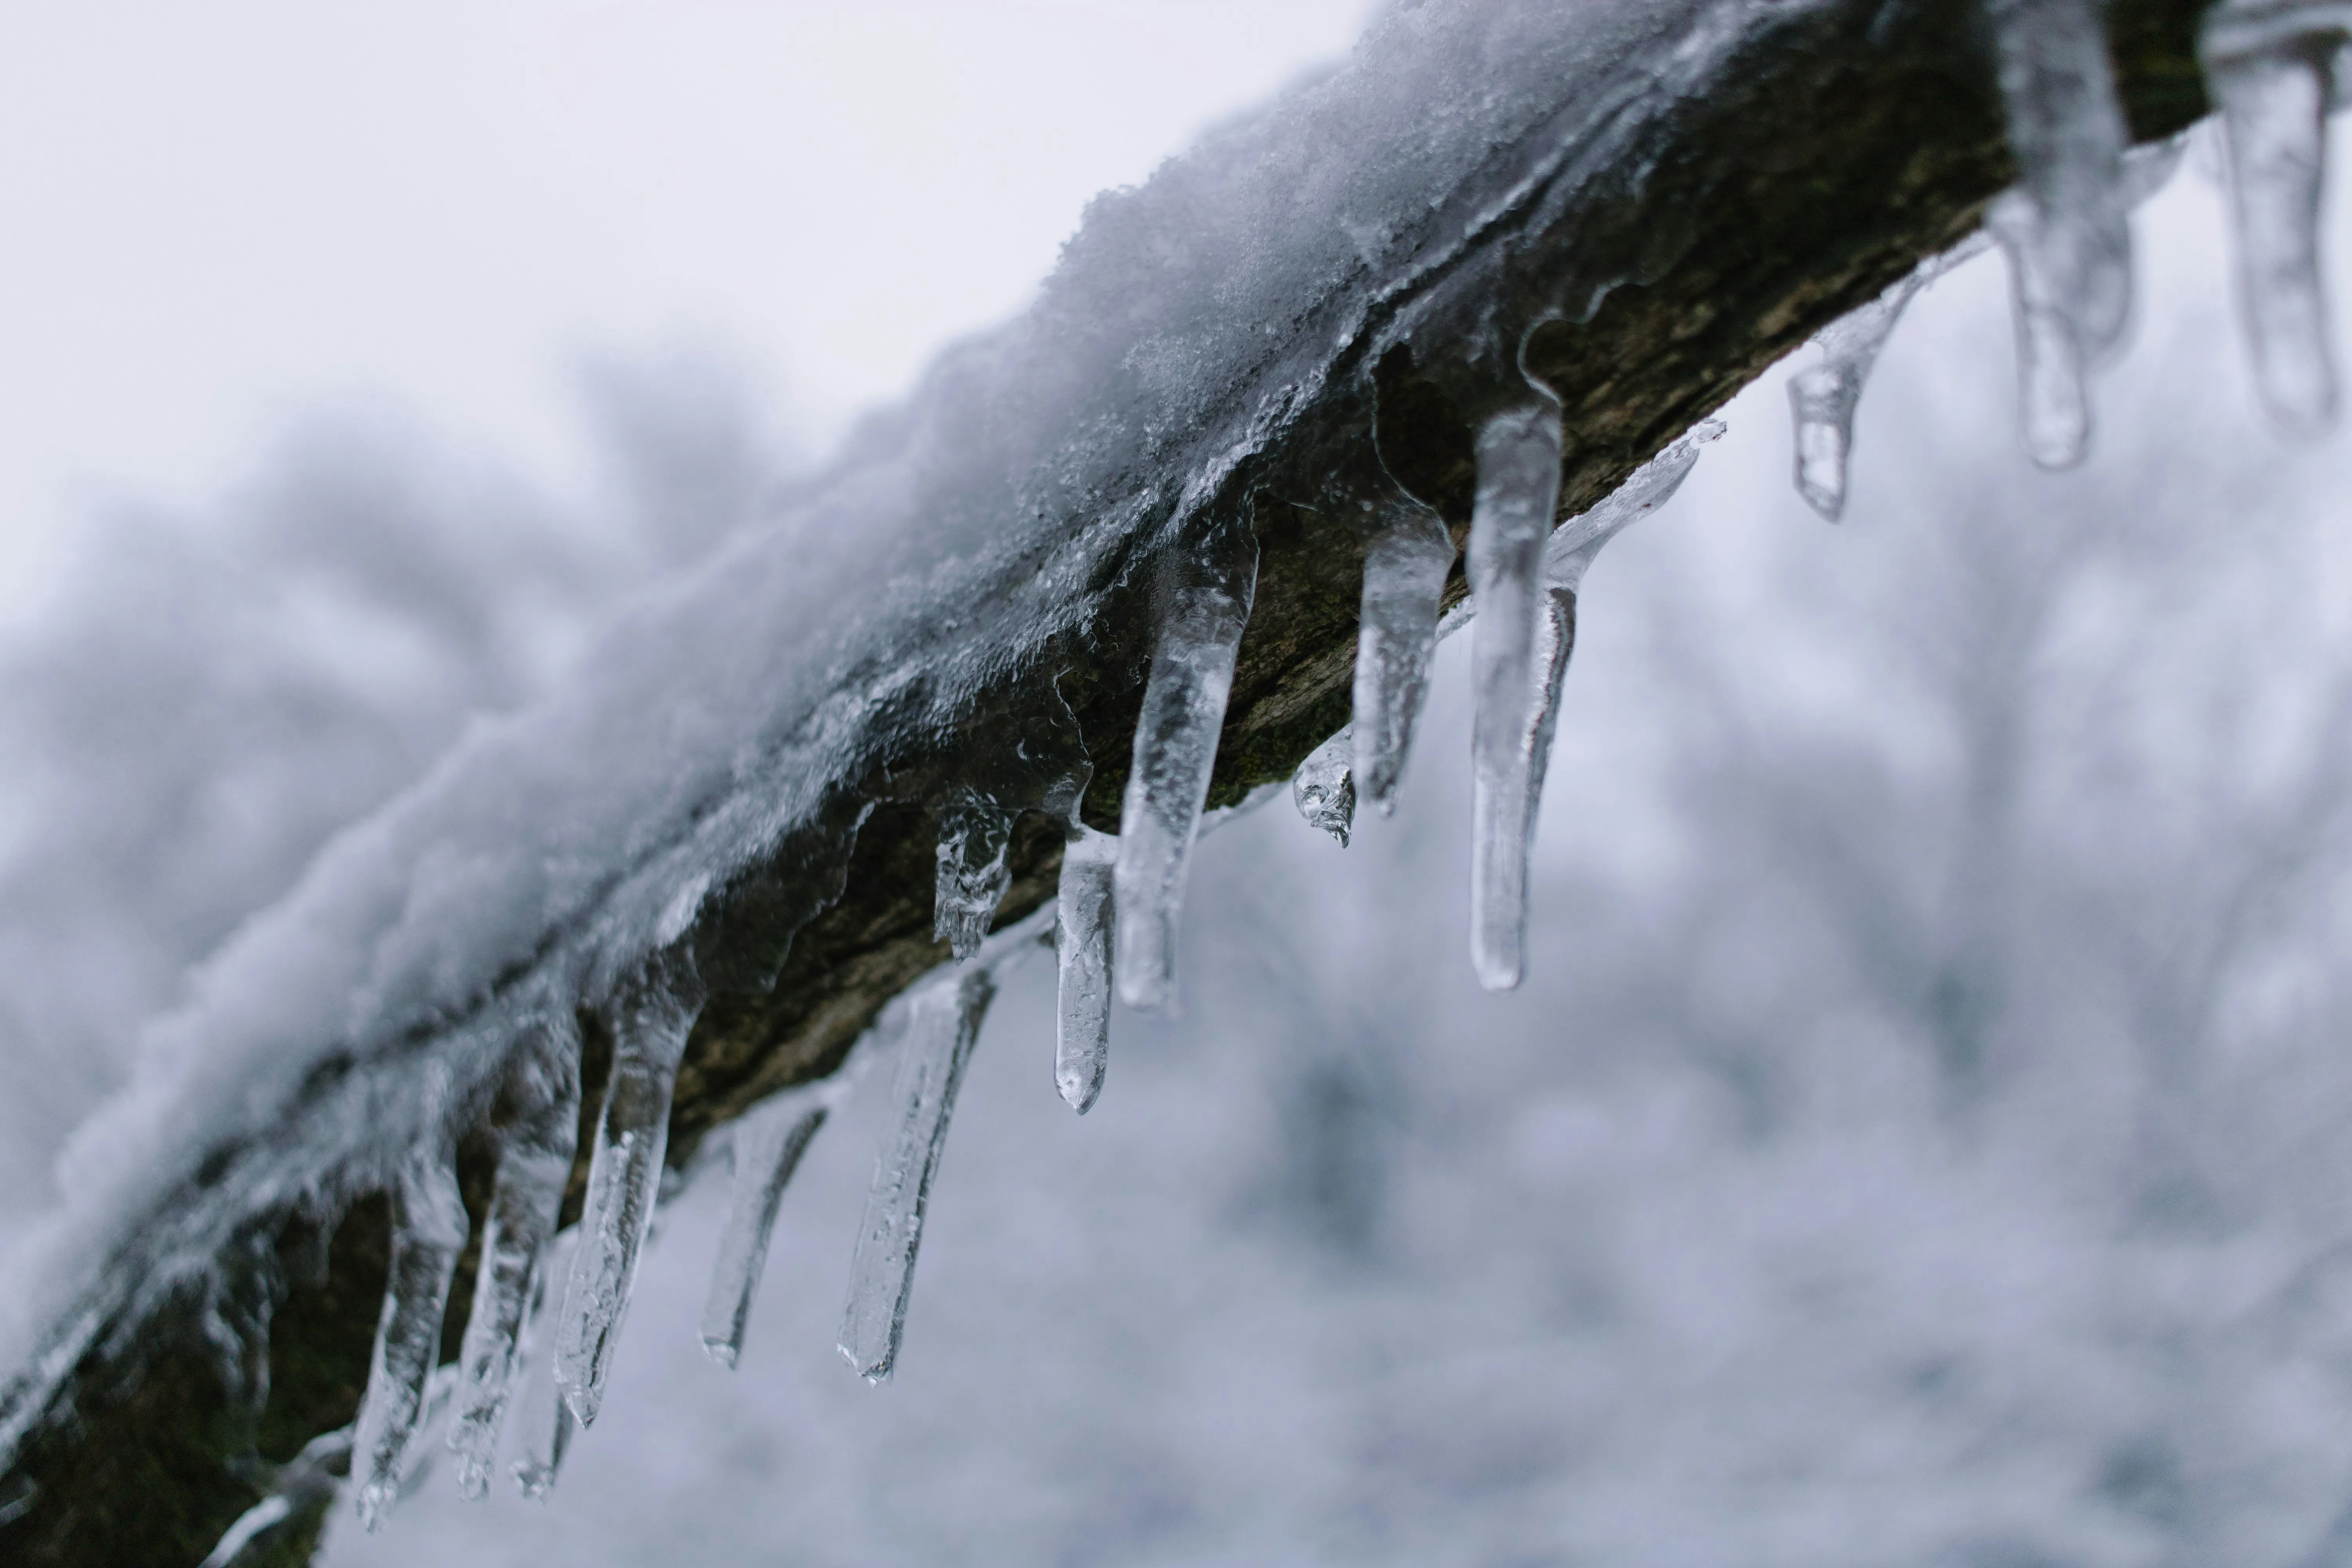
Surface ripples and microdetail
When you take a close look at your reference images, or observe icicles in nature, you will see that their surface is a mix between horizontal ripples and faint vertical streaks.
- The Ripples: The spacing of the horizontal ripples is almost always ~1cm, regardless of the icicles size. Ripples are caused by impurities (dissolved salts, minerals, etc). Perfectly pure/distilled water cant make them because it can’t create a stable, flowing film which is necessary for them to form. To recreate them you can for example use a Worley Cellular F2-F1 noise and scale it in the y-direction.
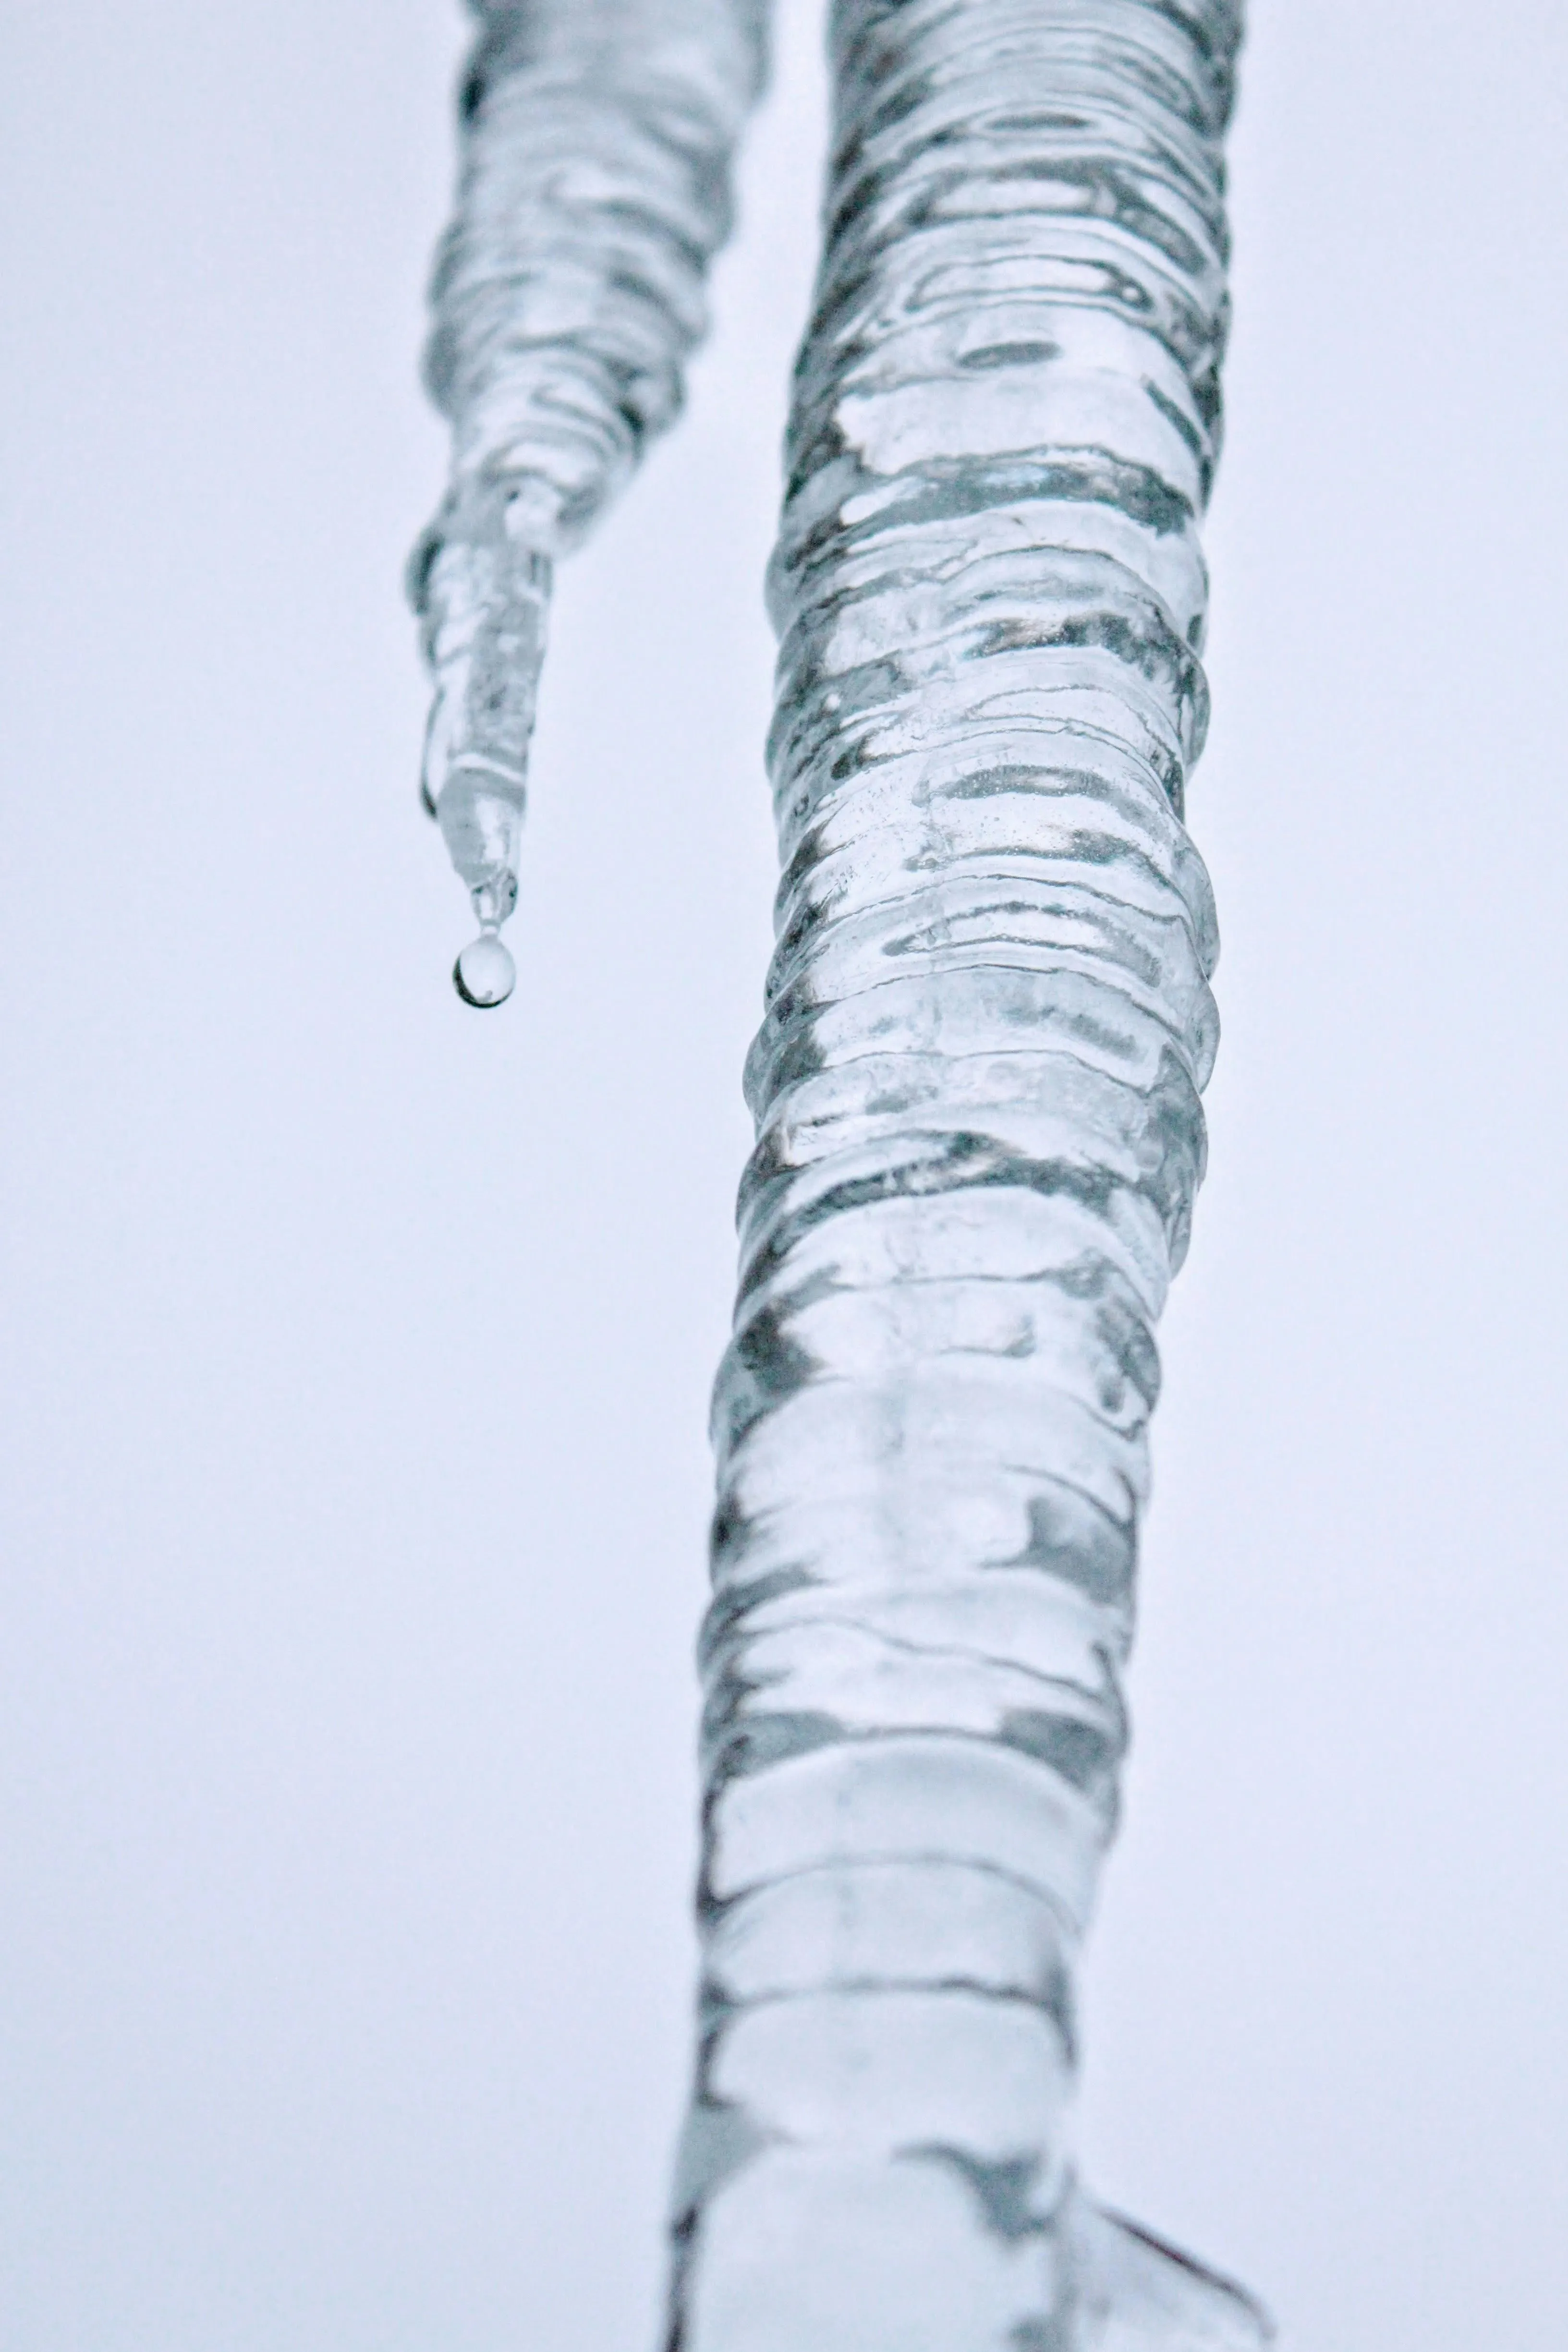
- The Microsurface: If you zoom even further into reference images you will see that the surface between the ripples consists of little streaky channels where the meltwater once flowed. Use a tiling Perlin or Musgrave noise in your normal/displacement map to fake this.
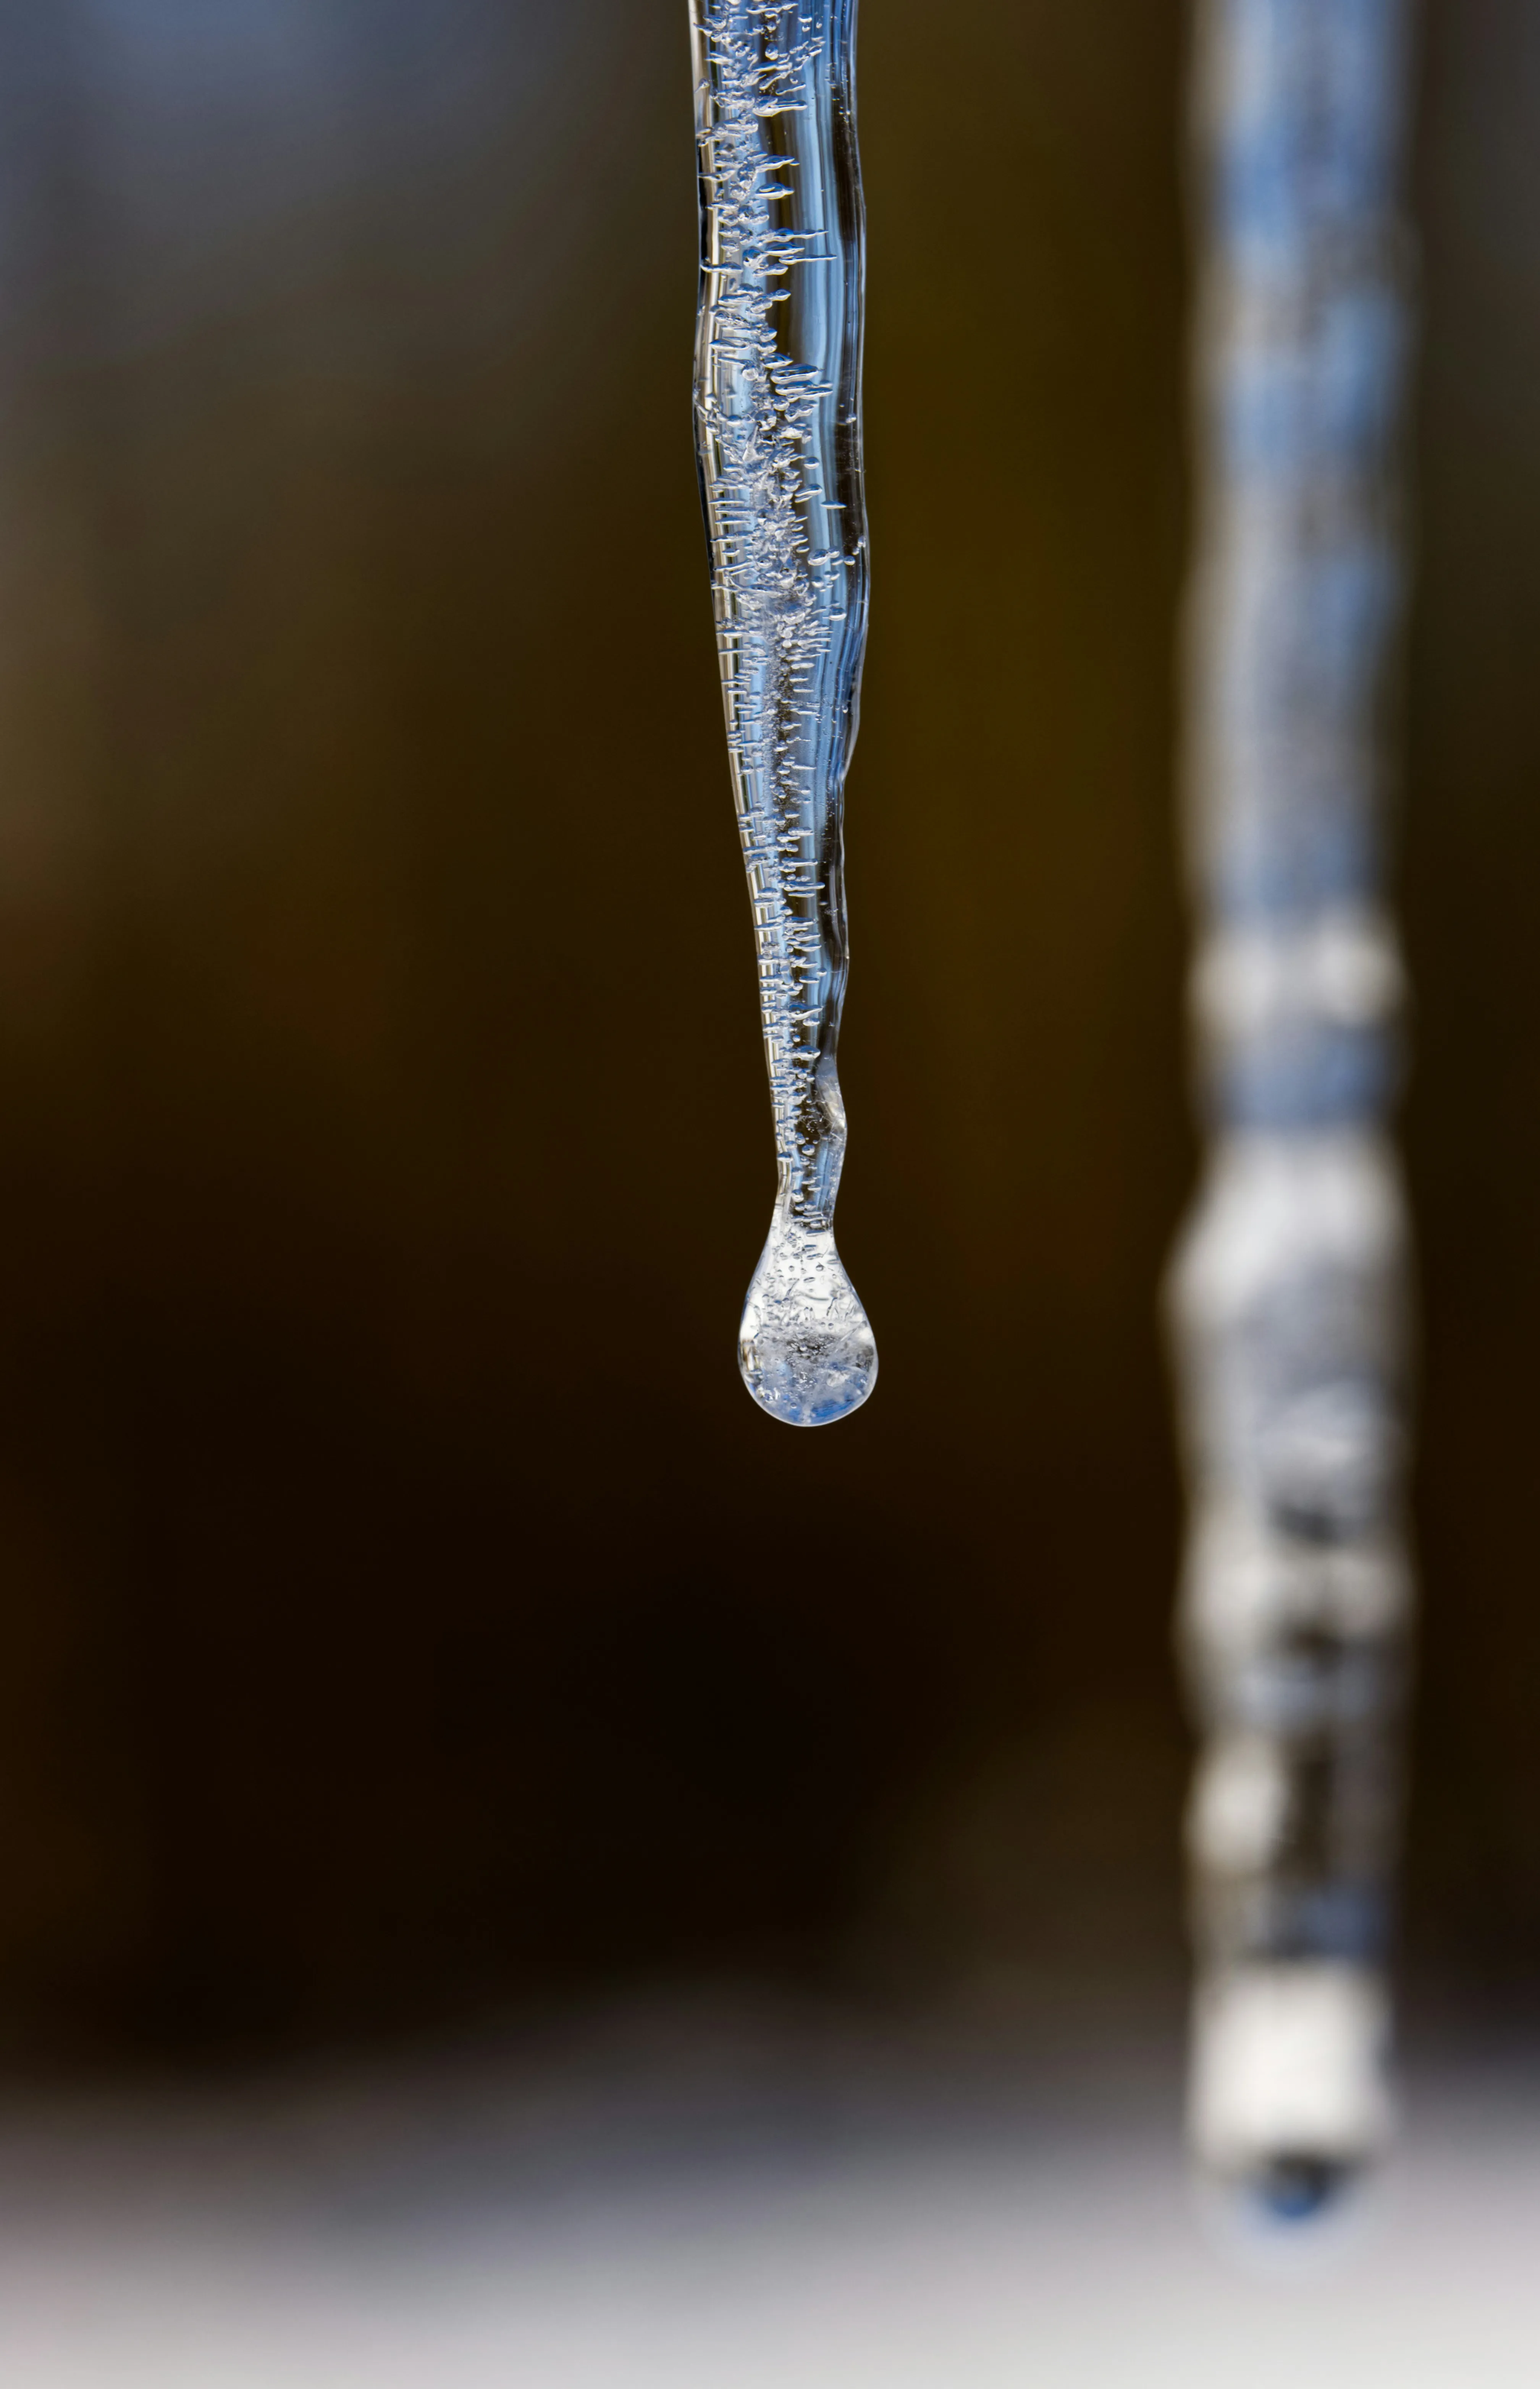
The frozen drip at the tip
Many icicles (especially those that are melting) will have a little droplet of water hanging onto the tip (it sticks due to surface tension). In my setup for The Last of Use II, I added a random “drop spawn chance” of about 30% to the HDA. I found this ratio is just enough to make it feel natural without overdoing it.
The internal structure: Clear Tips, Cloudy Bodies & Inclusions
If your icicle will have a closeup shot on a movie screen, you want to make sure to create the inside of it just as interesting and realistic as the outside. As water freezes it doesnt trap everything evenly. The growing icicle pushes out impurities like salt, minerals and air, which then gets trapped in the next layer of ice. Over time this process will create some distinct visual structures on the inside.
- Chevron Patterns: When you look at an icicle sliced open you will see some v-shaped forms inside which are stacked on top of each other and point upwards. These are called chevron patterns. They kinda look a bit like tree rings.
- Bubble Chains: Tiny air bubbles that group and stick together as the water freezes. They usually form vertical lines (chains) that follow the flow of meltwater, and scatter light.
Scale & Setting (aka Where & Why Icicles Form)
Icicles are great for environmental storytelling since their form, how large they get and color or clarity are all dependent on the conditions around them. Understanding these differences will help you by designing and placing them with purpose in your scenes.
Urban | Suburban
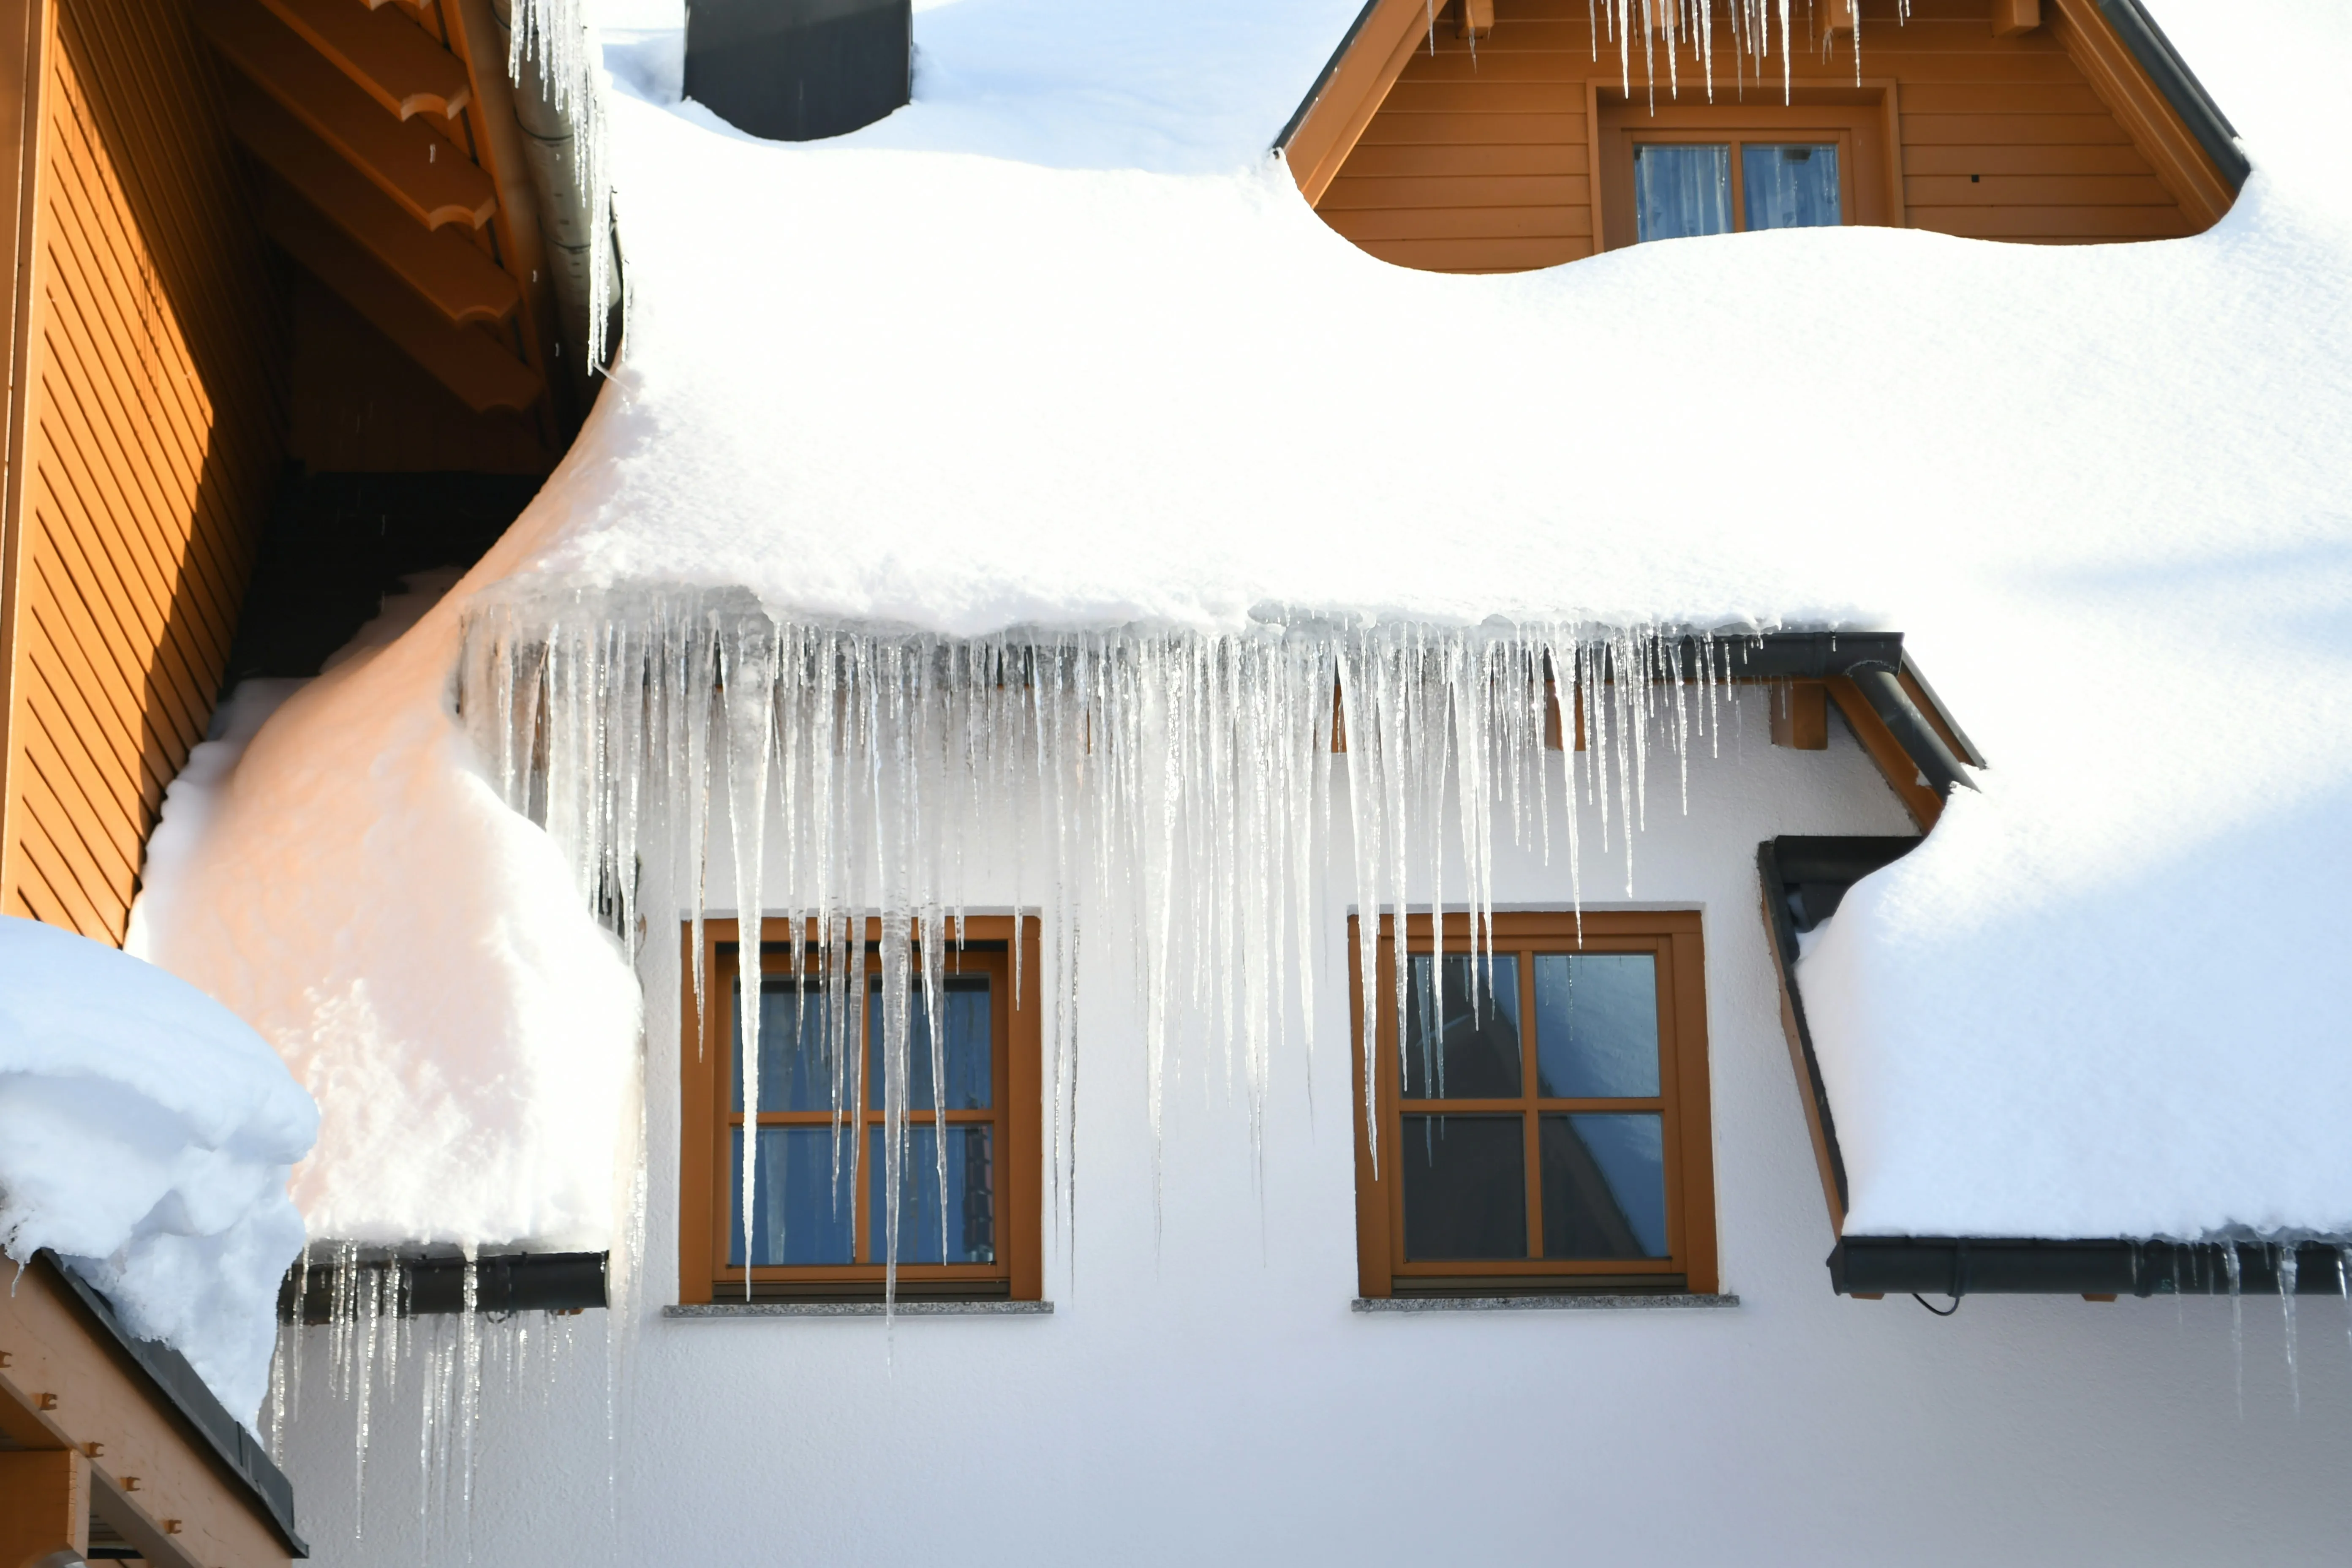
Icicles in man-made settings are often formed by an daily melt/freeze cycle caused by escaping heat -> they are relatively small (10cm-100cm) and rarely survive more than a few weeks. They’re often dirtier (e.g. from rust particles, dust or other types of pollution) and their shape is usually lumpy due to the repeated partial melting and refreezing.
On houses we mainly see them bundled up in the dense areas right at the edge of a roof. The secret behind this is a phenomenon called an “ice dam”, which is a simple chain reaction:
- Heat from inside the building escapes upwards and warms the roof -> melting the snow from below.
- This meltwater now flows down the roof until it reaches the edge, which isn’t heated from underneath and is still exposed to the freezing cold air.
- In this area the water refreezes and is slowly building up a literal dam of ice.
- The water running down the roof gets trapped behind this dam, pools up, and eventually overflows after a while -> thats creating the classic “curtain of icicles” that you can see on winter roofs.
So when you are tasked to scatter icicles on houses, make sure that they’re concentrated right along the gutters and roof edges where the dam forms and appear more sparse towards the middle. The area above the dam most likely has thinner snow or (no snow at all) due to the heat from the rooms below. The shingles right behind the icicles should be a bit darker since they’re wet from the trapped water.
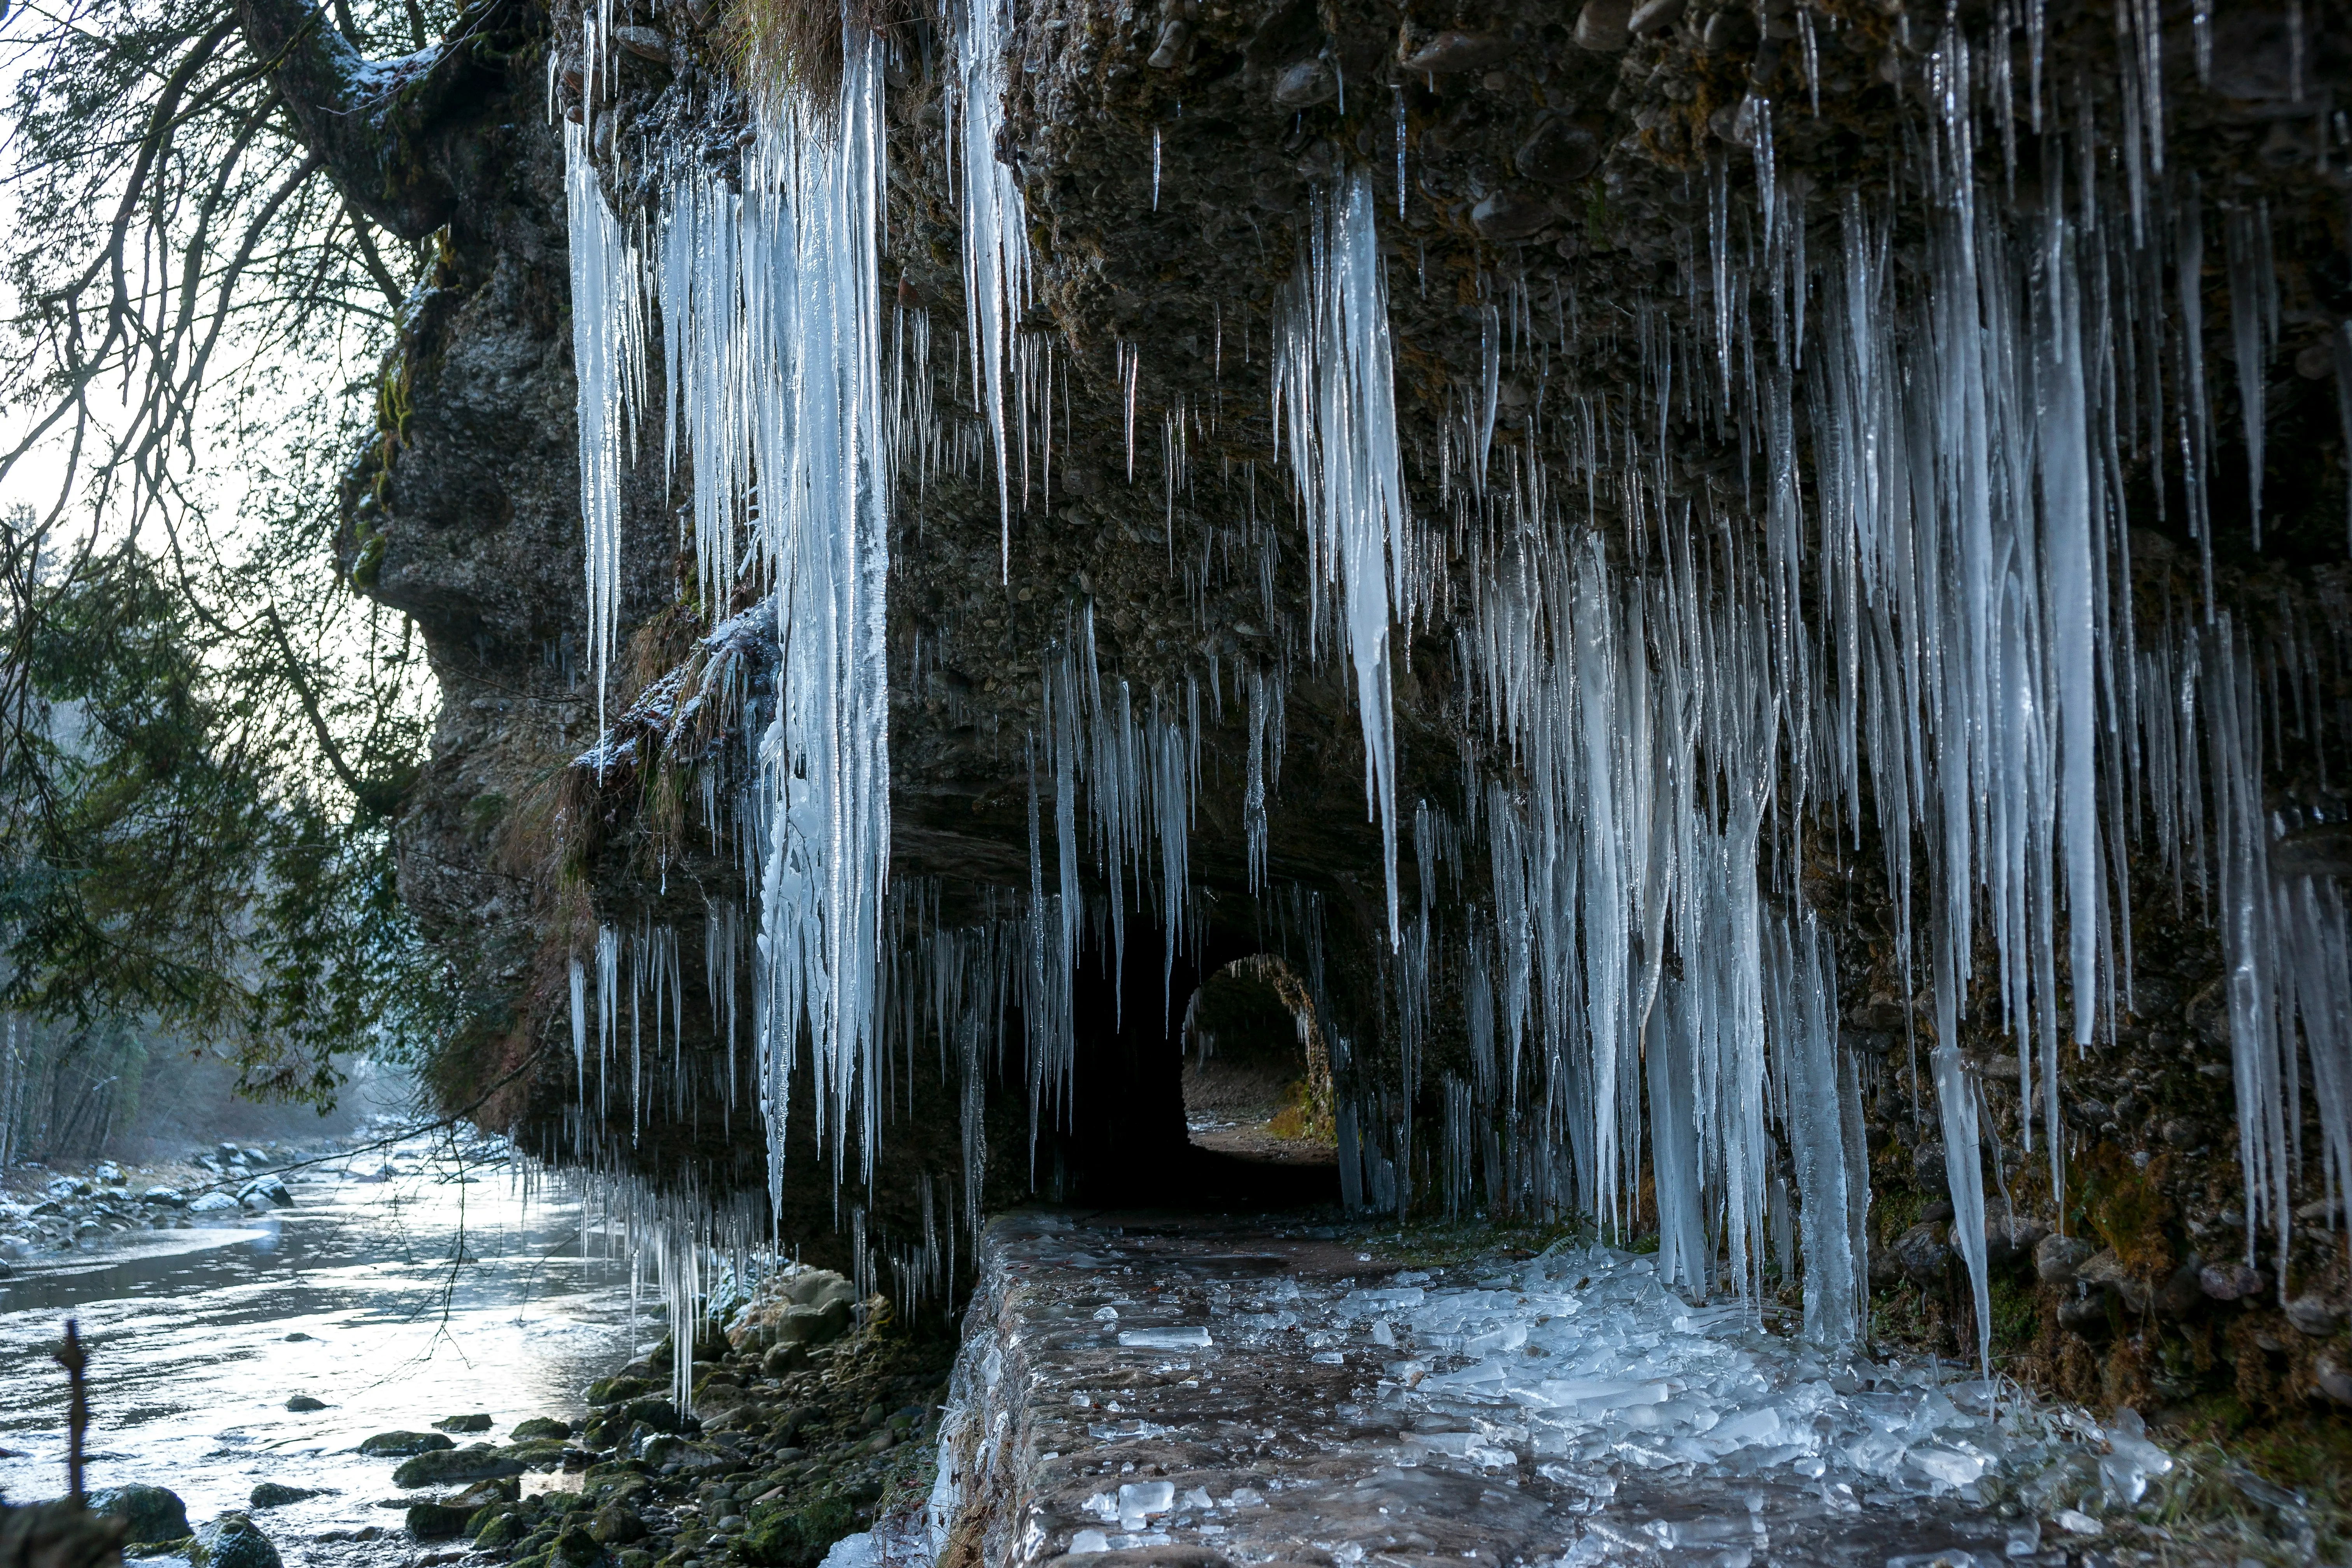
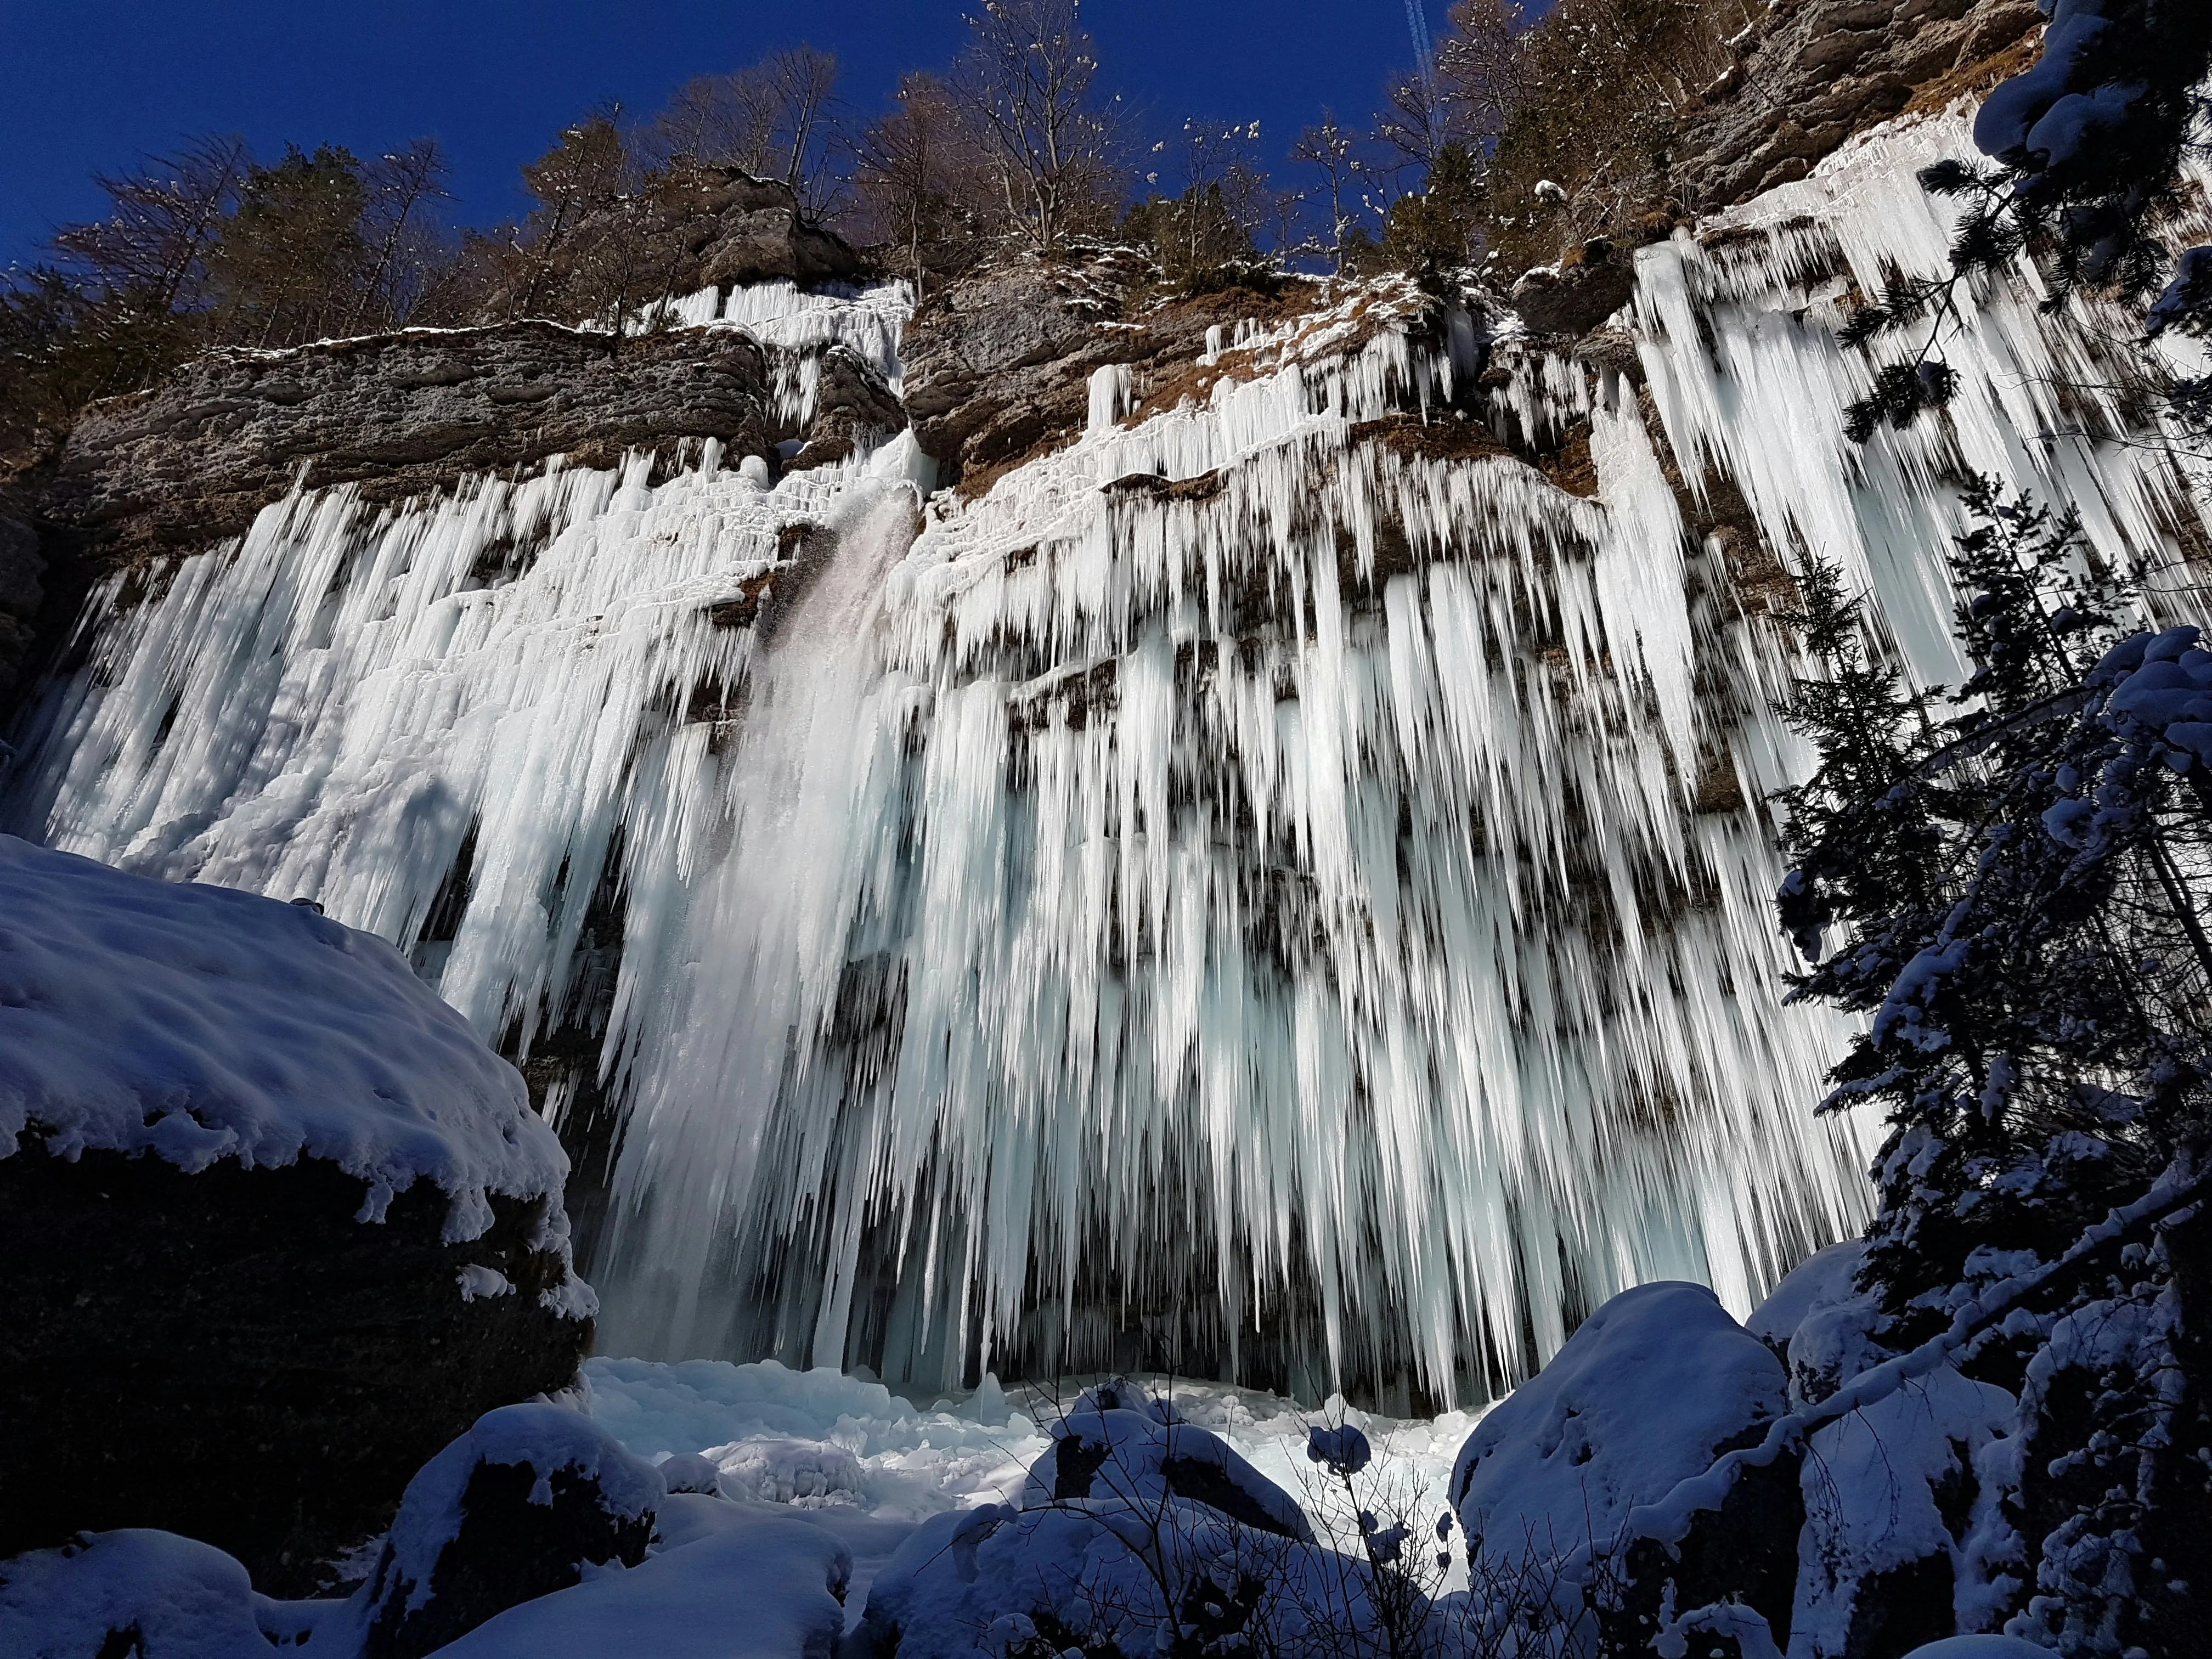
Natural Cliffs & Overhangs
Icicles that form in nature (on rock faces, cliffs, ledges, etc) often do so because of melting snow from above. They can grow into enormous sizes (easily 3m-6m) and exist throughout the winter. They connect into wide “organ pipes” or curtains.
The meltwater comes from cleaner sources but often has some mineral deposits in it which can give the icicles slight color variants of amber, rust or some slight orange tones (from iron and sediment). They also grow in more open areas that are exposed to strong winds which will give them little curves and variations.
Glaciers & Ice Caves
The icicles you find deep inside glaciers or ice caves aren’t formed like our examples above, so forget about sun and dripping water. They’re either created by the glaciers geothermal heat or the immense pressure of its own weight which is melting the ice.
They are some of the clearest ice formations you can find, because the air gets squeezed out under pressure, which will remove internal impurities and leaves the ice nearly transparent. The famous deep blue hue is caused by how thick ice absorbs the light.
Their surface is much smoother since its shaped by slow internal flow and not by external dripping.
When shading these make sure to switch from subsurface scattering to refraction (if you need it to be that detailed). The clarity of the ice means your shader should be much more like glass, but give it a deep blue color (make the deep blue the absorption or refraction color). With this setup the light will correctly travel through it, just like in real life.
When modeling them think more about making them “fluid and organic” instead of “spiky” like before. Because they are so clear they can bend and refract the light, which is a great opportunity to really slow down your rendertime and introduce caustics.
From Metal to Wood: How different surface types affect growth
The material an icicle hangs from is pretty important because it acts as its anchor, and as that it determines how easily the meltwater freezes, how the base looks and even how they cluster together! The main difference is that they conduct heat differently, and when we look at our references we can see the following patterns:
- Metal (gutters, signs, railings): A great heat conductor, which means it cools down quickly and its a solid anchor for the ice to “grab” on. So when our meltwater reaches it it freezes almost instantly, which visually will create a row of dense and straight icicles. They are usually evenly spaced and sharp.
- Wood (log cabins, branches): Wood is an insulator. It doesnt get as cold and also doesnt cool down as fast as metal. The meltwater first soaks into the porous wood grain or bark texture before freezing, which leads to wider and more irregular bases. The icicles are more scattered because of this. They often form shorter and uneven clusters with a more linear shape instead of the long and pointy ones.

- Rock & Concrete (cliffs, bridges, tunnels): Rock and concrete both have a high thermal mass which means they stay cold for a long time. That quality makes them an ideal foundation for large and heavy icicles with more complex formations. Meltwater flows through the small openings and freezes on its way out, so its often seamlessly connected and blends into the surface, rather than having a visible attachment point. When the water flows through multiple cracks it creates complex colonies.
- Plastic & Vinyl (siding, signs): Water doesn’t “stick” to these surfaces as well (low surface energy makes the droplets slide down before they freeze).So when u encounter some plastic assets in your scene make sure to only rarely place icicles here, or even none at all. When you do, make sure theyre small, thin and isolated instead of in clusters.
Clustering and Distribution: The Logic of an Icicle Colony
Icicles rarely grow alone, but their placement isn’t random. They form in groups because water doesnt flow and spread across surfaces evenly -> it follows paths. To replicate this procedurally, you don’t want a simple “random scatter” (In fact, finding true randomness in nature is exceptionally rare). Instead, you want a distribution that feels organic. Many smart people have been figuring out different types of cluster algorithms, but since we are artists we don’t have to care about complex math. In our case it is best to use a noise-driven density mask to simulate a poisson disk distribution.
What that means: A Poisson Disk algorithm basically places points randomly, but it ensures that no 2 points are closer than a specified radius -> the result is a organic and natural way of scattering.
Ok but which noise should I use?: Use a Perlin or Simplex noise texture to control both the density and the scale. The bright parts of the noise get lots of big hero icicles, while the dark parts get sparse, small ones or none at all. You can refine this by using different noise textures for density and scale, or layering them. This mimics how water finds its preferential paths in nature.
Integrating Icicles to their Surrounding
This might be one of the most overlooked steps ever (not just in icicles but in 3D art as a whole). An icicle doesn’t just hang from a surface, it much rather grows out of it. We need to show that physical connection and the effect it has on its surroundings.
-
The “Spread” or “Foot”: Water doesn’t drip from an infinitely small point. It flows over an edge and freezes, creating a wider, lumpy or uneven base that “grips” the surface. When modeling your icicles, make sure the top isn’t a perfect circle. Flare out the top slightly and make it irregular, and add a few frozen drips and let the ice spread horizontally along the edge or surface from where it’s hanging from. That gives the impression that meltwater has flowed and refrozen again and again over time.
-
Flowing from Cracks: On surfaces like rock or concrete, water seeps from cracks, seams or any porous spots before it drips and freezes. Your icicle base should look like it’s seamlessly spreading or growing out from these crevices and cracks.
-
Merging and Fusing: In dense clusters, multiple icicles often share (and fight for) the same watersource. So over time their bases will gradually freeze together which creates a single, solid and uneven mass of ice from which individual icicles then hang. Don’t be afraid to merge a few tops into one combined ice shape. This is especially true along gutters, roof edges (where ice dams form) and cliff overhangs.
LookDev for Ice - Materials and Shading
A great model with a bad shader will always look fake. The key is to remember this: Ice does not behave like glass. Glass absorbs light versus ice that scatters it. Getting this right is what will make your icicles look believable.
How Ice interacts with light
Before we touch any shader settings, let’s quickly check out what we are trying to achieve.
-
Subsurface Scattering (SSS) is King: This is the most important property of ice. Light doesn’t just pass straight through. It enters the ice, bounces around off all the internal bubbles and impurities, and then exits at a different spot. This internal scattering is what creates the soft, milky glow that is so characteristic of ice. Without SSS, your icicle will look like hard plastic or glass.
-
Internal Reflections & Glow: Because of its refractive index, some light gets trapped inside the icicle and bounces multiple times before it can escape. This is especially noticeable when the icicle will be seen in a backlit setting. It will give it a bright, glowing core which you cant fake with simple transparency.
-
Anisotropy (Light Streaking): The vertical bubble chains, crystal structures and impurities inside the ice act like tiny fibers. This can cause light to scatter more up-and-down than side-to-side (light stretches vertically). That means we get some slightly long highlights which follow the icicle shape. It’s a very subtle detail, but if you have been reading until here you probably want to add it since it adds a lot of realism.
-
Subtle Color Variation: Ice doesnt have a uniform color, it rather reflects the environment around it. It will pick up a slight blue tint in shadows (from the ambient blue of the sky) and can reflect warm tones from a wooden roof above or the ground below. But since most of us will work with PBR materials, this will already get solved in rendering.
Building a realistic ice shader
You can set this up in any render engine. The names of the settings might be a little different, but the principles are the same.
-
Base Color: Set this to almost pure white (around 0.95) or a very pale, desaturated blue. The real color should come from the subsurface or volumetric effects, not from this parameter.
-
Transmission / Transparency: Set this to its maximum value (usually 1.0 or pure white). You want to tell the renderer that this is a fully transparent object and let the other settings control the clarity.
-
Roughness: This should never be a single, flat value. Use a procedural noise map that is stretched vertically to mimic the streaks from water flow. A good range is from 0.05 (for the wet, smooth streaks) to 0.4 (for the rougher, frosty bands between the ripples).
-
IOR (Index of Refraction): Set this to 1.309. This is a critical value. Do not use the IOR for glass (1.5)! This is a very common mistake that will instantly make your material look wrong.
-
Volumetrics and Subsurface Scattering:
- For most assets SSS is the best method. Use a 3D noise to control its density or scale -> making some areas clearer than others. Give the SSS a slightly blue radius to tint the scattered light.
- For hero assets that will get extreme close-ups, you can use an actual volume shader with a 3D noise texture for controlling the density. This is heavy to render but gives you the most realistic result.
-
Render Settings: Make sure your render engine supports multiple transparency bounces (sometimes you gotta enable this manually). Allow for a high number of transparent/transmission bounces (e.g., 12 or more). This lets light properly bounce around inside the icicle. Depending on your needs you should also have some settings to turn on refraction and caustics.
FAQ
Q: How can icicles grow when the air is below freezing? A: They need a heat source from above to create meltwater, like sunlight on a rock or heat escaping from a house.
Q: What is the ideal weather for icicles? A: Sunny days just below freezing, followed by very cold nights. This creates the melt-freeze cycle they need to grow.
Q: Why are impurities in water important for icicles? A: They are essential. They allow water to form a stable film, which is needed to create both the tapered shape and the 1cm ripples. Pure water makes lumpy irregular icicles that arent as visually pleasing. If your icicles are really close to the camera you would model the impurities, if its further away just solve it via texturing.
Q: What is the single biggest mistake artists make? A: Making perfectly smooth and transparent cone and call it an icicle. Real icicles have a curved profile, a cloudy core, and bumpy surface ripples.
Q: What is the correct IOR for ice? A: The Index of Refraction (IOR) for pure ice is 1.309. It’s very close to water (1.33) and very different from glass (1.5).
Q: How do I make the internal cloudy patterns? A: Use a 3D procedural noise in your shader to drive the density of a volume or the scale of your Subsurface Scattering (SSS).
Q: How can I optimize icicles for real-time or games? A: Use LODs (Levels of Detail) and combine clusters into a single mesh to reduce draw calls. If you want to have a simpler shader you can bake the look of SSS into your base color texture.
Q: How do I make my icicles feel more natural and less perfect? A: Add variation! Vary the shapes with slight bends, vary the tips (sharp, melted, broken), and vary the cluster sizes following the “big, medium, small” rule (a few big ones, some medium, many small ones).
Exercises
-
Study Reference: Find high resolution photos of icicle clusters. Analyze the following:
- The main “hero” icicle
- The ripple pattern (is it rings or bumps?)
- The clear tip vs. the cloudy core
- Any visible internal bubbles or patterns
- The wetness/staining on the surface where its attached to
- The spherical drip at the tip of any icicle
-
Create a Shader Sphere: Create a simple sphere in your 3D software. Your goal is to make it look like a ball of cloudy, frozen ice without any modeling. Focus on balancing IOR (1.309), Subsurface Scattering (with a blue radius), and a procedural roughness texture/noise for your desired look. ALWAYS look at reference.
-
Procedural Ripples: Create a cylinder. Experiment with different noises such as Worley to recreate the ripples and bumps. You can make it more advanced by using and adjusting 2 textures with another, but more isnt always better. Displace the cylinder. Make sure it has enough subdivisions and make sure they’re more or less square for accurate displacement. Since displacement is heavy I like to apply it to the mesh and then decimate the polycount until the point where my silhouette would change too much.
Further Resources
-
Check out the work of Stephen Morris at the University of Toronto. His “Icicle Atlas” is an insanely detailed guide with visual information. They recreated a vast amount of icicle formations under different circumstances and filmed everything.
-
Chasing Ice is also a watchworthy documentary
-
Some cool examples of realtime ice solutions: The Last of Us Part II, God of War, Horizon Zero Dawn: The Frozen Wilds